到底是谁的 CIDR?

原文:Whose CIDR Is It Anyway?

https://labs.ripe.net/author/jschauma/whose-cidr-is-it-anyway

【以下由 微软Bing 机翻】

IP 地址空间并没有被平均分配,经过多年的重新分配和重新分配,我想到的问题是:谁拥有它的哪些部分?在有关互联网集中化的系列文章的最新一篇中,Jan Schaumann 深入研究了数据,试图获得更清晰的视图。


今年是 2035 年,是桌面版 Linux 的一年(祈祷,这将是它!),IPv6 的广泛采用迫在眉睫,而 Amazon 刚刚购买了它没有拥有的最后一个 /8:。255.0.0.0/8

我们是怎么走到这一步的?

首先,我认为我们比 2035 年更接近这种情况,因为 Amazon 已经在内部使用 E 类地址,为什么不呢:

$ traceroute www.amazon.com
traceroute to e15316.dsca.akamaiedge.net (23.209.110.82), 64 hops max, 40 byte packets
 1  244.5.5.97 (244.5.5.97)  8.543 ms
    244.5.5.81 (244.5.5.81)  3.580 ms
    244.5.5.97 (244.5.5.97)  6.846 ms
 2  240.0.56.98 (240.0.56.98)  0.388 ms
    240.0.56.65 (240.0.56.65)  0.367 ms
    240.4.112.65 (240.4.112.65)  0.352 ms
 3  242.0.227.213 (242.0.227.213)  1.687 ms
    242.0.227.81 (242.0.227.81)  1.448 ms
    242.0.227.83 (242.0.227.83)  1.055 ms
 4  240.3.180.14 (240.3.180.14)  1.319 ms
    240.3.180.12 (240.3.180.12)  1.320 ms
    240.3.180.15 (240.3.180.15)  1.991 ms
[...]

当该网络块最终由 IANA 分配时,这将很有趣(例如,本草案中提议的1)和 Amazon 基本上会说“对不起,我们有 dibs。你不能指望我们重新编号所有 EC2,所以你还不如把整个 /4 给我们,kthanxbye。

(旁注:当然,它们的 IPv6 地址会做其他人做的事情,并将 IPv4 地址编码在其 v6 地址的底部字节中:

$ traceroute6 www.amazon.com
traceroute6: `www-amazon-com.customer.fastly.net' has multiple addresses; using `2606:2cc0::374'
traceroute6 to www-amazon-com.customer.fastly.net (2606:2cc0::374) from 2600:1f18:400c:b800:bdf1:6584:1971:4efe, 64 hops max, 12 byte packets
 1  2620:107:4000:2210:8000:0:f405:667  58.911 ms  # 244.5.102.7
    2620:107:4000:2210:8000:0:3ec:3e71  0.831 ms
    2620:107:4000:2210:8000:0:3ec:3e73  0.808 ms
 2  2620:107:4000:a792::f000:3841  0.419 ms        # 240.0.56.65
    2620:107:4000:a792::f000:3843  0.473 ms
    2620:107:4000:a792::f000:3842  0.4 ms
 3  2620:107:4000:cfff::f20c:2b01  17.258 ms       # 242.12.43.1
    2620:107:4000:cfff::f20c:2b81  12.562 ms
    2620:107:4000:cfff::f200:e353  2.026 ms
 4  2620:107:4000:c5c0::f3fd:1  1429.46 ms  1299.83 ms
    2620:107:4000:c5c0::f3fd:3  1368.37 ms
 5  2620:107:4000:cfff::f202:d4c3  2.15 ms
    2620:107:4000:cfff::f202:d545  1.931 ms
    2620:107:4000:cfff::f202:d445  1.358 ms
 6  2620:107:4000:8001::24  2.469 ms
    2620:107:4000:8001::44  10.271 ms
    2620:107:4000:8001::24  1.16 ms
[...]
$

这种做法对于戴着各种帽子的信息安全书来说非常有用,因为巨大的 IPv6 地址空间变得更加易于管理,通过这种方式,您可以收集有关目标的其他信息,所以谢谢你 – 但我跑题了。

总之,我想你明白我要说的是什么了:我们被告知,IANA 将 IP 空间分配给地区注册管理机构,他们进一步管理分配的网络块。一些早期采用者从 Jon Postel(最初的 IANA)那里得到了一份特别的礼物:他们自己的 /8。

在区域注册表级别,可用的 IP 空间没有均匀分配。如果我们去掉保留的 IP 空间(总共 35 /8,包括 E 类、组播和选定的其他网络块),只查看分配给不同区域互联网注册机构 (RIR) 的实际可用 IP 地址,那么我们会发现 ARIN 管理着超过 50% 的 IPv4 IP 空间,而 AFRINIC 只管理着 2.7%。相比之下,IPv6 地址空间的分配要均匀得多:

当然,当我们用完 IP 地址时,网络块被重新分配和重新分配,在区域注册表之间转移,公司开始交易网络块,如果你有一个备用的 /9 左右,这被证明是一个非常好的快速赚钱方式。

这样的例子有很多,例如谷歌在 2017 年从 Merit Networks 购买了 35.192.0.0/12,但让我们以亚马逊为例:

哦,在 2023 年,AWS 开始对公有 IPv4 地址的使用收费:0.005 USD/小时

但我开始这项研究基本上是因为我碰巧正在查看 AWS 发布的 ip-ranges 文件,我心想:“嗯,光是一家公司就有这么多 IP 地址。这甚至不是 Amazon 的全部,只是 AWS:

$ curl -s https://ip-ranges.amazonaws.com/ip-ranges.json | jq -r '.prefixes[].ip_prefix' | wc -l
    9180
$ curl -s https://ip-ranges.amazonaws.com/ip-ranges.json | \
    jq -r '.prefixes[].ip_prefix' | \
    awk -F/ '{ sum += 2^(32-$2) } END { printf("%'"'"'d\n", sum) }'
144,578,747
$

顺便说一句,如果你应用 Amazon 的逻辑,对每个 IP 地址每小时收取半美分的费用,那么那里的 CIDR 每年为 Amazon 提供 63 亿美元的净价值。不算太寒酸。

但是,看着 Amazon 在这里拥有的巨大股份,以及各种其他 netblock 交易、重新分配和重新分配,我在想:我们甚至知道谁拥有 IP 空间的哪些部分吗?我的意思是,当然,我们有点“知道”,因为这些信息是必须可用的……地方。但是我们如何看待这些数据呢?

现在,如果您自己恰好不是 RIR,您该如何查找这些信息呢?我们知道 CIDR 块分配在 中,虽然它非常简单,而且当你是人类时,输出真的很容易阅读,但试图大规模地使用数据做任何事情都会一团糟whoiswhoiswhois

“有些人在遇到问题时会想’我知道,我会用 whois。’现在他们遇到了非结构化的文本问题。

幸运的是,RIR 自己发布了统计数据,以有据可查的格式显示了他们在此处联合进行的 ASN、IPv4 和 IPv6 分配(或按 RIR 为 AFRINIC、ARIN、APNIC、RIPE NCC 和 LACNIC)。这些数据如下所示:

$ curl -s https://ftp.ripe.net/pub/stats/ripencc/nro-stats/latest/nro-delegated-stats | \
    grep "|ipv4|"
[...]
iana|ZZ|ipv4|0.0.0.0|16777216|19810901|reserved|ietf|iana
apnic|AU|ipv4|1.0.0.0|256|20110811|assigned|A91872ED|e-stats
apnic|CN|ipv4|1.0.1.0|256|20110414|assigned|A92E1062|e-stats
apnic|CN|ipv4|1.0.2.0|512|20110414|assigned|A92E1062|e-stats
apnic|AU|ipv4|1.0.4.0|1024|20110412|assigned|A9192210|e-stats
apnic|CN|ipv4|1.0.8.0|2048|20110412|assigned|A92319D5|e-stats
apnic|JP|ipv4|1.0.16.0|4096|20110412|assigned|A92D9378|e-stats
apnic|CN|ipv4|1.0.32.0|8192|20110412|assigned|A92319D5|e-stats
apnic|JP|ipv4|1.0.64.0|16384|20110412|assigned|A9252414|e-stats
apnic|TH|ipv4|1.0.128.0|32768|20110408|assigned|A91CF4FE|e-stats
[...]
$

这非常有用,但请注意,我们没有得到实际的 CIDR 分配 — 我们得到的是起始地址和 IP 地址计数。我们确实得到了国家/地区代码信息(是的!),但没有 AS 信息,也没有所有权数据。所以不完全是我们正在寻找的。

但是,嘿 – 我们记得因为 whois 很愚蠢,互联网已经同意使用 RDAP 来代替了?那会很整洁!RDAP 是 RESTful 的!这是 JSON!它在 RFC 中指定(这么多很多很多很多 RFC),甚至还有真正有用的文档

$ curl -s -L https://rdap.db.ripe.net/ip/2.19.4.0
{
  "handle" : "2.19.0.0 - 2.19.15.255",
  "startAddress" : "2.19.0.0",
  "endAddress" : "2.19.15.255",
  "ipVersion" : "v4",
  "name" : "AKAMAI-PA",
  "type" : "ASSIGNED PA",
  "country" : "EU",
  "parentHandle" : "2.16.0.0 - 2.23.255.255",
  "cidr0_cidrs" : [ {
    "v4prefix" : "2.19.0.0",
    "length" : 20
  } ],
  "status" : [ "active" ],
  "entities" : [ {
    "handle" : "AKAM1-RIPE-MNT",
[...]

这看起来非常有用,但当然,最后我使用了所有这些交叉事实来源的组合:我只是从 开始,查找 RDAP 信息,提取 ,确定紧随其后的地址,然后重复 RDAP 查找,以这种方式迭代整个 IPv4 空间。0.0.0.0endAddress2然后,我对 Team Cymru 的 IP 到 ASN 服务执行了 DNS 查找,并使用通常的 Perl、 和 shell 胶水大杂烩,将所有这些数据与已发布的 RIR 统计数据进行交叉引用。awk(1)

现在,使用多个事实来源的问题是 — 正如任何曾经尝试过创建、使用或与之交互的人(例如资产清单)所告诉您的那样 — 您充其量只能获得所有不同来源的交叉视图。还有 bug。

“whois 很愚蠢*,请使用 RDAP。那会很棒!…他们说

使用标准化协议从互联网上的不同来源收集大量数据的有趣之处在于,它如何破坏您对标准化协议的信念,同时让您对遇到的所有边缘情况感到困惑。

RDAP 有很多优点,但该服务由五个以上的主要方(RIR 加上各种区域 NIC)运行,我发现了许多错误和问题:

  • 带和不带负载正文的 HTTP 重定向
  • 在 RIR 之间重定向循环3
  • RDAP IP 查询结果不包括 AS 编号(有时包含)whois
  • AFRINIC 有 API 限制,但不会告诉您它们是什么
  • 超过未知 API 限制时,AFRINIC 返回 429 状态代码 (yay),但没有 Retry-After 标头 (boo)
  • https://rdap.registro.br/会告诉你他们的 API 限制是每 20 秒 1 个请求;如果你超过它,那就是 403 Forbidden – 再见!(是时候轮换源地址了…
  • AFRINIC 有时会返回 -1 的网络掩码(例如196.28.253.0/22)
  • endAddressCIDR0_CIDRS4
  • ARIN 和 LACNIC 在 RDAP 中不包含国家/地区代码信息
  • JPNIC 不包含分配类型,实际上是将其设置为null

所以是的……

RDAP:与 “” 相同 GIGO,但至少它是 JSON。

whois

按国家/地区代码划分的 IPv4 分配

在收集并关联所有数据后,我最终得到了大约 300K 的信息5近 240 个国家/地区的 CIDR 分配。6CIDR 分配计数排名前 10 的国家/地区7是:

  1. 🇷🇺 俄罗斯(> 17K 分配)
  2. 🇩🇪 德国 (12.5K)
  3. 🇧🇷 巴西 (12.1K)
  4. 🇬🇧 英国 (11.8K)
  5. 🇮🇳 印度 (9.4K)
  6. 🇨🇳 中国 (9.3K)
  7. 🇦🇺 澳大利亚 (7.2K)
  8. 🇳🇱 荷兰 (7.2K)
  9. 🇯🇵 日本 (7.1K)
  10. 🇺🇸 美国 (6.5K)

但并非所有 CIDR 都是相等的 – 分配了数百个 /24 并不能弥补分配一个 /8。也许计算 IP 地址可能会更好?我们可以轻松地将这些数字相加,然后将它们与 IPv4 地址空间的总量进行比较:

  1. 🇺🇸 美国(1.61B 个 IP,占所有 IPv4 的 43.8%)
  2. 🇨🇳 中国 (343.17M, 9.3%)
  3. 🇯🇵 日本 (189.81M, 5.1%)
  4. 🇬🇧 英国 (127.41M, 3.5%)
  5. 🇩🇪 德国 (124.21M, 3.4%)
  6. 🇰🇷 韩国 (112.5M, 3.1%)
  7. 🇧🇷 巴西 (87.14M, 2.4%)
  8. 🇫🇷 法国 (82.18M, 2.2%)
  9. 🇨🇦 加拿大 (68.52M, 1.9%)
  10. 🇮🇹 意大利 (54.03M, 1.5%)

这里突出的当然是分配给美国的大量 IP 地址,以及美国和中国合计占 50% 以上的事实,是整个 IPv4 地址空间 75% 以上的前十个国家。

按国家/地区代码划分的 IPv6 分配

对于 IPv6 分配,我的数据仅基于 RIR 统计数据。总的来说,那里的信息没那么有趣,仅仅是因为 IP 空间如此之大,以至于集中化真的不是问题。为了完整起见,我在此处列出了 IPv6 的发现:

有趣的是,显然,中非共和国、厄立特里亚和朝鲜(以及南极洲、福克兰群岛、法属南部和南极地区、科索沃、斯瓦尔巴群岛和扬马延岛以及西撒哈拉)都没有 IPv6 分配。

按 RIR 分配的 IPv4

非洲人

如果我们从区域注册管理机构的角度来看,我们会注意到 AFRINIC 覆盖的不仅仅是非洲,尽管 AFRINIC 的前十名分配(占其所有分配的 80% 以上)都位于非洲大陆。嗯,除了香港:

这里需要注意的一点是,RIR 统计数据仅确定了 AFRINIC 向其分配 IP 块的 54 个国家/地区,但从 RDAP 收集的数据暗示了更广泛的传播。这表明这里正在进行相当活跃的 CIDR 区块交易。

另一个惊喜(至少对我来说)是向毛里求斯这个相对较小的国家进行了大量拨款。通常,我预计分配与人口大致成正比,尽管一个国家的经济权重在这里起着更大的作用:至少在 2014 年,毛里求斯在非洲排名第三。但话又说回来,AFRINIC 的总部设在毛里求斯……啊啊。

APNIC 的

毫不奇怪,APNIC 将中国列为拥有 IP 地址最多的国家/地区,其次是日本和韩国,前十名中的其他国家至少都在亚洲,尽管它们再次高度集中:中国、日本和韩国几乎占 APNIC 分配的所有 IP 地址的 75%:

阿林

ARIN 在此处分配的 IP 地址的地理分布仅来自 RIR 统计数据,因为 ARIN 提供的 RDAP 数据不包括国家/地区代码。与其他 RIR 一样,我们看到的分配远远超出了其假定的地理区域,当然,不出所料,主要的异常值是美国,占 ARIN 所有分配的 95% 以上:

  1. 🇺🇸 美国(1.59B 个IP,95.4% 的 ARIN,~37% 的所有 IP)
  2. 🇨🇦 加拿大 (68.2M, 4.1%)
  3. 🇵🇷 波多黎各 (757K)
  4. 🇨🇿 捷克共和国 (395K)
  5. 🇯🇲 牙买加 (222K)
  6. 🇧🇧 巴巴多斯 (168K)
  7. 🇧🇸 巴哈马 (138K)
  8. 🇬🇧 英国 (136K)
  9. 🇻🇮 美属维京群岛 (118K)
  10. 🇧🇲 百慕大 (108K)

LACNIC

与 ARIN 一样,LACNIC 的 RDAP 服务不提供国家/地区代码(尽管提供),因此此处的统计数据同样仅基于 RIR 统计数据:nic.br

  1. 🇧🇷 巴西(87.14M 个 IP,占 LACNIC 的 45.8%)
  2. 🇲🇽 墨西哥 (29.02M, 15.3%)
  3. 🇦🇷 阿根廷 (19.46M, 10.2%)
  4. 🇨🇴 哥伦比亚 (17.37M, 9.1%)
  5. 🇨🇱 智利 (10.03M, 5.3%)
  6. 🇻🇪 委内瑞拉 (6.71M, 3.5%)
  7. 🇵🇪 秘鲁 (3.24M, 1.7%)
  8. 🇪🇨 厄瓜多尔 (2.71M, 1.4%)
  9. 🇺🇾 乌拉圭 (2.44M, 1.3%)
  10. 🇨🇷 哥斯达黎加 (2.34M, 1.2%)

请注意,LACNIC 似乎是受区域限制最严格的注册机构,如果您愿意的话,它几乎保持在指定的边界内。也就是说,其他 RIR 向 LACNIC 进行的 IP 区块交易似乎较少。

成熟的 NCC

现在,我们冗余的欧洲 IP 网络协调中心是具有最广泛全球影响力的 RIR,负责全球 164 个国家/地区的分配:

  1. 🇩🇪 德国(130.75M IP,占 RIPE NCC 的 15.2%)
  2. 🇬🇧 英国 (130.48M, 15.2%)
  3. 🇫🇷 法国 (87.03M, 10.1%)
  4. 🇮🇹 意大利 (56.69M, 6.6%)
  5. 🇳🇱 荷兰 (48.7M, 5.7%)
  6. 🇷🇺 俄罗斯 (47.29M, 5.5%)
  7. 🇪🇸 西班牙 (33.9M, 3.9%)
  8. 🇸🇪 瑞典 (28.93M, 3.4%)
  9. 🇨🇭 瑞士 (25.2M, 2.9%)
  10. 🇵🇱 波兰 (20.35M, 2.4%)

按分配类型划分的分配

我查看的另一件事是不同 RIR 分配了哪些类型的网络块。此信息可在 RDAP 响应中找到,请记住,RDAP 很棒,因为它定义明确!例如,RFC9083 告诉我们:

type – 一个字符串,其中包含根据该 RIR 的注册模型对网络进行的特定 RIR 分类

哦,天哪,一根绳子。井。是的。因此,不同的 RIR 选择定义不同的字符串也就不足为奇了:

例如,请参阅 APNIC 对不同分配类型的解释;通常,“PA”代表“提供商可聚合”,而“PI”代表“独立于提供商”。

按类型划分的所有 22 个不同分配的完整分布如下所示:

这些数据有一个警告:JPNIC 的 RDAP 结果始终将“Allocation Type”字段设置为 。但是,让我们按 RIR 比较这些分配。null

为了帮助我们回答谁拥有 CIDR 的问题,将本地注册管理机构的分配与最终用户的分配分开可能是有意义的。遗憾的是,不同的 RIR 对这些 RIR 使用不同的类型(在上面的每张图片中以红色圈出),但实际上这是一个很难区分的地区。

例如,ARIN 的“DIRECT ALLOCATION”应该用于本地注册管理机构和 ISP/电信公司,但尚不清楚例如,可能为其 ATM 网络重新分配净块的银行是否被视为本地注册管理机构;就我们在这里的目的而言,他们是同一个所有者。哦,当然,RIPE NCC 的“传统”分配可能是也可能不是最终用户分配。谁知道呢。

分配大小

接下来,我查看了分配的 net blocks 有多大。我发现了 25 种不同的 CIDR 大小,其中 ~5K 分配为 /n < /16,~7.2K 分配为 /n > /24。大多数是 /24s、/22s 和 /23s,但当然还有 23 个 /8s、11 个 /9s,以及光谱两端不可忽略的异常值:

数据科学书告诉我,饼图很糟糕,所以下面是相同数据的帕累托图:

让我有点惊讶的是 /32 分配的显著数量 (1,387),但除此之外,/24 分配是迄今为止最常见的分配,这也反映在所有 RIR 的分配中——除了 LACNIC,它似乎更偏爱 /22。(您可以在此处查看每个 RIR 的帕累托图: AFRINIC、APNIC、ARIN、LACNIC、RIPE NCC

为了方便起见,我还检查了 IPv6 分配大小(70 种不同的分配大小;22 个 CIDR /n < /32(252K 个分配),18 个 CIDR /n > /48(572 个分配),9 个 CIDR /n > /100(22 个分配)),其中 /24 也是最受欢迎的一个。当然,在 IPv6 中,/24 大约是 2 个十分 IP 地址,而不是 256 个,但没关系。

按网络名称划分

但我仍在寻找网络区块的实际所有者名称。RDAP(很像 )使用“网络名”标识子网,因此我们可以按分配频率以及分配给给定网络名的 IP 地址总数来计算这些子网。whois

每个 “网络名称” 可能与大量不同的自治系统 (AS) 编号相关联,而 “网络名称” 当然不一定具有很强的描述性或揭示性:要尝试将这些名称映射到实际的组织名称,您需要相当多的人为关联。

此外,有时您需要知道(或推断)不同的实体实际上是同一个实体:“Amazon Technologies Inc.”和“Amazon.com Inc.”显然是相关的,但被确定为“Level 3 Parent LLC”和“Century Link Communications”拥有的网络具有相同的父所有者(在本例中为 Lumen Technologies, Inc.)这一事实远非明显。8

按 AS 编号划分的分配

尝试通过将 IP 地址与 AS 编号相关联来映射数据(如上所述,主要通过 Team Cymru 的 IP 到 ASN 服务),我发现了大约 63K 个不同的 AS 编号:

(是的,这张图中突出显示的“斯塔克工业”是布赖恩·克雷布斯最近在不同的上下文中讨论的那个。我之所以提到它,只是因为它让我觉得这是一个非常科技兄弟的名字。

但观察到的 AS 频率是一个因素。如果我们统计给定 CIDR 的 IP 地址并按 AS 映射这些地址,则会出现不同的视图:

换句话说,我们发现自己是触摸大象的盲人之一——我们从不同的侧面得到不同的观点,却没有真正得到完整的视角。尝试将 AS 编号和网络名称组合在一起并手动将它们与实体相关联,我得出了拥有最多 IP 地址的顶级组织的粗略分布,这些地址占所有 IP 空间的很大一部分,并且至少在一定程度上回答了我们最初的问题。前十名(无论如何,按这个计数计算)是:

  1. 美国国防部(352M 个 IP 地址,占所有 IPv4 地址的 8.19%)
  2. 亚马逊(181M,4.21%)
  3. 中国电信 (112M, 2.61%)
  4. AT&T (111M, 2.59%)
  5. Verizon (101M,2.35%)
  6. 康卡斯特 (71M, 1.64%)
  7. Lumen Technologies (65M, 1.52%)
  8. Microsoft(59M,1.37%)
  9. 软银 (48M, 1.1%)
  10. 韩国电信 (46M, 1.08%)

这里需要指出的一点(除了 DoD 是一个明显的异类)是只有两家公司不是电信提供商:Amazon 和 Microsoft。所有其他公司实际上是 ISP 和 Telco。

总结

嗯,这是很多数据,都呈现出略有不同的观点。这些数据是否回答了我们关于谁拥有哪些 CIDR 的主要问题?只是在某种程度上,真的。整个练习有点令人沮丧,但以下是一些结论性发现:

首先,区分 “最终用户” 和 LIR 真的很难。Amazon 是否是 LIR,因为不同的客户通过 AWS 使用他们的 IP 空间?

我们还发现不同的 RIR 定义存在很多不一致之处,这使得数据难以关联,并且 RDAP 中的一些数据在单个 RIR 内不一致、有缺陷或不完整。我已经向不同的 RIR 报告了一些发现;一些发现已经得到解决,但总的来说,我认为这是一个有很大改进空间的领域。

另一件让我有点惊讶的事情是,区域互联网注册管理机构似乎比您想象的要少得多,因为区块被交易、转让或分配给其所在地区以外的实体。

但总的来说,根据我所看到的,看起来大约 30% 的 IP 地址只由少数组织管理,当然,国防部仍然拥有其中的大部分9

我们已经看到,除了 ISP/电信公司或 LIR(对他们来说拥有大部分 IP 空间似乎是合理的)之外,前十名中只有两家大型互联网公司。这两家公司也恰好控制着互联网或行业和市场的其他方面,这再次暗示了中心化的趋势。

最后,对 IPv6 进行相同的练习就没那么有趣了。它太多了,以至于交易 netblocks 等的考虑因素并不那么相关。IPv6 很无聊。这是一件好事。我真的很喜欢无聊 – 我们应该做更多这样的事。甚至可能在 2035 年之前。

ICANN终止OpenTLD(Freenom)认证 – 域名转移到Gandi

”人人都熟悉的名字“ — Freenom.com

已经使用了近十年,很好的一家,良心域名注册商,还是被遭到了毒打。Freenom以极低的价格提供域名注册,费用号称成本价,比如.NL 、.EU,还提供TK、CF、GA、GQ、ML 域名的免费注册。最早就是从免费的.TK 域名知道它的。

大约从2023年初开始,已经很久不能注册新域名了。之前看到说是,被Facebook母公司Meta , 在美国加利福尼亚州法院起诉 。被起诉后 Freenom 就由于技术原因新注册申请暂停,当前正在研究解决方案,希望尽快恢复运营。

2024年1月15日我还曾在Freenom续费域名,到2月初,发现域名已经无法续费了。2024/2/12收到了Gandi.net 的支持邮件,告知ICANN终止了OpenTLD(Freenom)的认证- 域名转移到Gandi:

Gandi Support: OpenTLD (Freenom) ICANN accreditation termination – Transfer to Gandi – Recover your domain

Dear registrant,
We are reaching out to you as the owner of the domain name as32.net which was registered with the registrar OpenTLD B․V․, trading as Freenom.
Following the termination of OpenTLD accreditation, ICANN has selected Gandi as the gaining registrar for the gTLD domain names previously managed by OpenTLD. You can find more information about this transfer on the following ICANN page:
https://www.icann.org/resources/pages/bulk-transfers-2017-10-06-en.
If you have not already recovered the management of this domain name at Gandi, please follow the link below. You will be able to import the domain name into your Gandi account if you already have one, or create a Gandi account to be able to manage your domain name.
Import your domain name
We kindly request your attention to the following points:
– Gandi does not provide proxy and privacy services. Consequently, your contact information has been sent to the registry. However in the Whois public database, personal data remain hidden in accordance with ICANN rules. Only the organisation name for legal persons, the state (if available) and the country of the owner contact are published. Email addresses of domain name contacts are anonymized.
– The expiration date of the domain name remains unchanged. You can verify the expiration date via your Gandi account and proceed with renewal if necessary.
Should you have any question, our support team will be delighted to help you:
https://helpdesk.gandi.net.
Thank you for your attention to this matter.
____________________________________________________________

about this transfer on the following ICANN page:
https://www.icann.org/resources/pages/bulk-transfers-2017-10-06-en.

请注意:下表列出了因注册服务机构的认证被 ICANN 终止后所致的批量转移事件。此外,批量转移日期将在终止日期之后。

Terminated RegistrarGaining RegistrarTermination Date
OpenTLD B.V. (IANA #1666)Gandi SAS (IANA #81)25 November 2023
https://www.icann.org/resources/pages/bulk-transfers-2017-10-06-zh

https://www.rayks.com/article/freenom-pending.html

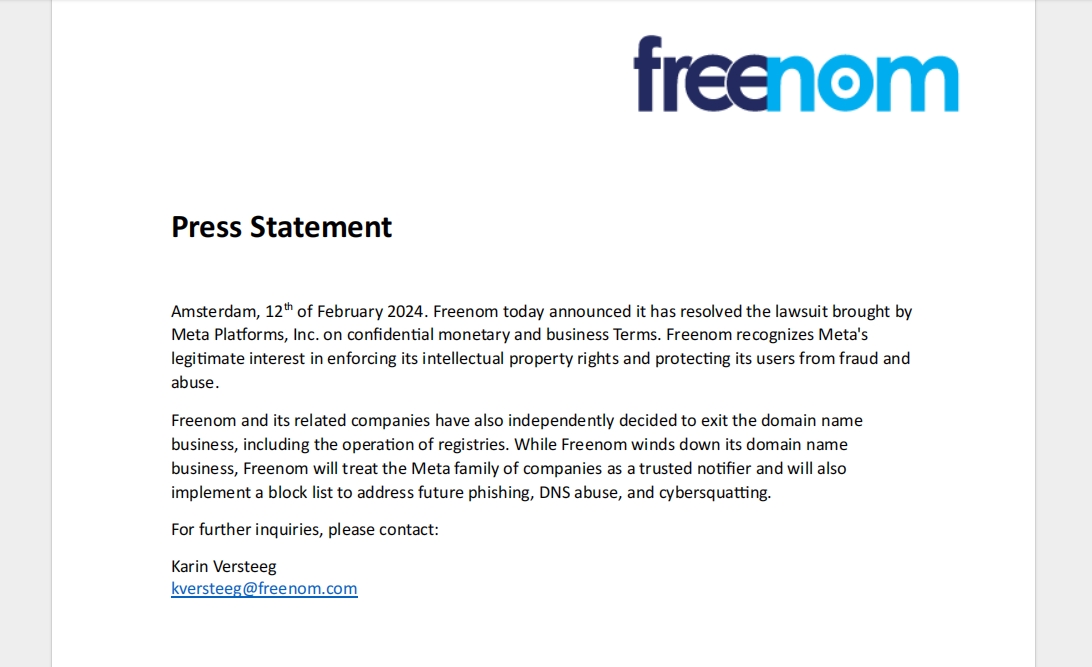
2024 年 2 月 12 日,知名域名注册服务提供商 Freenom 通过其官方网站发布公告,表示 Freenom 及其相关公司已决定退出域名业务,包括注册机构的运营。


Freenom 公司已于 2023 年 3 月 9 日全面停止了新域名的注册业务,但未回收已注册域名且域名到期续费功能也保持开放状态,直到近期宣布“退出域名业务”决定后开始大量收回已注册域名。
Freenom 公司官方宣布内容译文及原文如下:
新闻声明
阿姆斯特丹,2024 年 2 月 12 日。Freenom 今天宣布已解决 Meta Platforms, Inc. Freenom 承认 Meta 在实施其知识产权和保护其用户免受欺诈和滥用方面的合法权益。
Freenom 及其相关公司也已独立决定退出域名业务,包括注册机构的运营。在 Freenom 结束其域名业务的同时,Freenom 将把 Meta 旗下公司视为可信赖的通知方,并将实施阻止列表,以应对未来的网络钓鱼、DNS 滥用和抢注行为。
如需进一步咨询,请联系:
Karin Versteeg
kversteeg@freenom.com
—————————————————原文如下—————————————————
Press Statement
Amsterdam, 12th of February 2024. Freenom today announced it has resolved the lawsuit brought by Meta Platforms, Inc. on confidential monetary and business Terms. Freenom recognizes Meta’s legitimate interest in enforcing its intellectual property rights and protecting its users from fraud and abuse.
Freenom and its related companies have also independently decided to exit the domain name business, including the operation of registries. While Freenom winds down its domain name business, Freenom will treat the Meta family of companies as a trusted notifier and will also implement a block list to address future phishing, DNS abuse, and cybersquatting.
For further inquiries, please contact:
Karin Versteeg
kversteeg@freenom.com
域名注册商 Freenom 宣布退出域名业务 大规模回收免费域名

https://www.rayks.com/article/freenom-pending.html

相关消息:

https://domainnamewire.com/2023/11/10/icann-terminates-opentld-famous-for-its-connection-to-tk-domains/

https://domainnamewire.com/2023/09/21/icann-sends-breach-notice-to-freenoms-accredited-domain-registrar/

https://www.icann.org/uploads/compliance_notice/attachment/1211/hedlund-to-zuurbier-20sep23.pdf

https://zhuanlan.zhihu.com/p/682465154

https://zhuanlan.zhihu.com/p/627211282

https://www.zhihu.com/question/591955285

https://www.zhihu.com/question/644205158

如何从 Debian 10 (Buster) 升级到 Debian 11 (Bullseye)

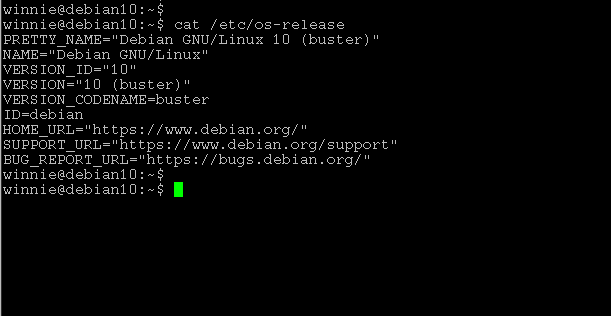
先查看确认Debian的版本

cat /etc/os-release
cat /etc/debian_version
lsb_release -a

更新包存储库:

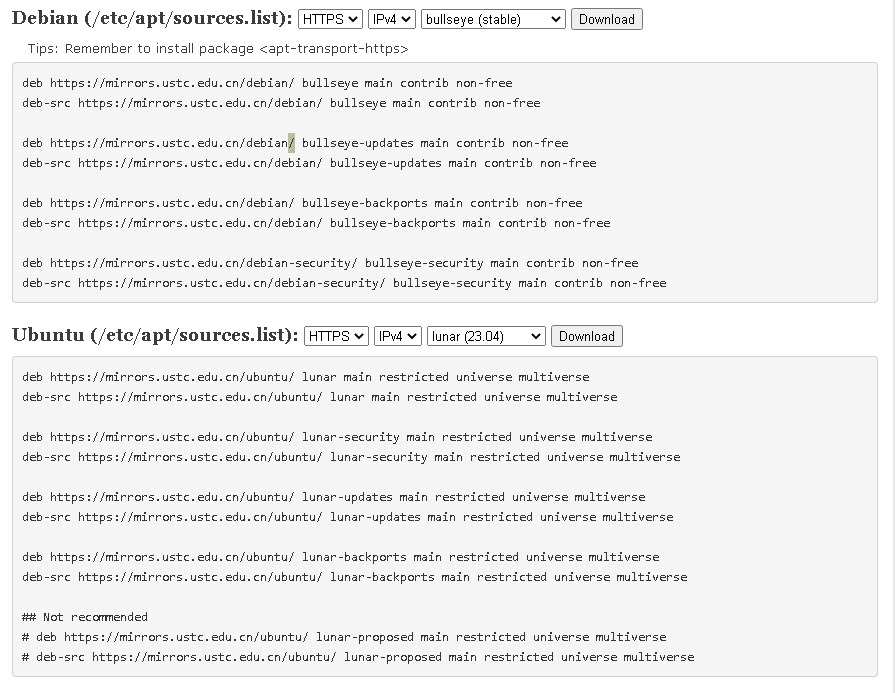
将 /etc/apt/sources.list 文件中的 buster 关键字替换为 bullseye

sudo sed -i 's/buster/bullseye/g' /etc/apt/sources.list

或者直接去这个地址生成一个sources.list文件,保存下来替换:

https://mirrors.ustc.edu.cn/repogen/

之后先更新下系统的软件包列表:

sudo apt update

再下一步,执行最小系统更新 upgrade --without-new-pkgs

执行完整的系统升级将删除系统中保留的大量软件包。因此,分两阶段的方法将 Debian 10 升级到 Debian 11。先进行最小升级,之后再进行完全升级。

在最小更新将只升级当前软件包,而不安装新软件包或删除现有软件包。执行以下命令:

sudo apt upgrade --without-new-pkgs

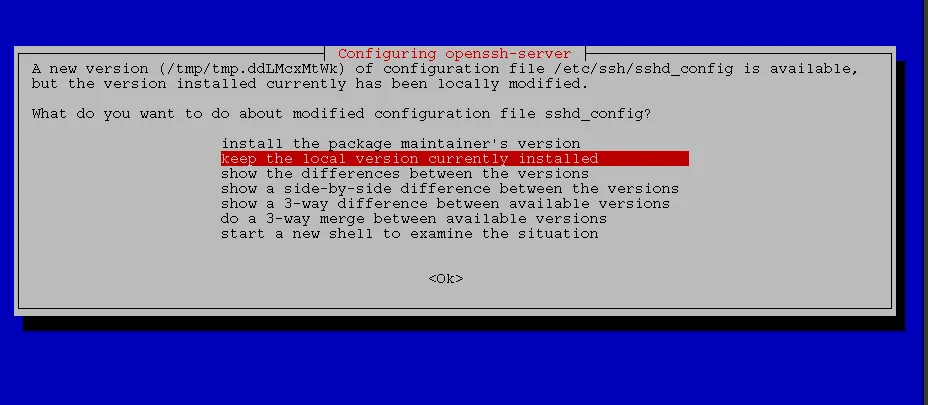
在此过程中,如果屏幕出现选择提示,要求重新启动系统服务或保留或删除配置选项。 一般都单击“是”,按回车键继续。

此步升级完成后,我们执行完整的系统升级(full-upgrade)将系统升级到 Debian 11。会安装 Debian 11 附带的最新软件包并解决依赖问题。

sudo apt full-upgrade

会再出现几次提示。比如Openssh提示做什么操作。选择了保留当前安装的选项,确定ok下一步。

等待完全升级完成,就可以重新启动系统了。

重启后,再查看系统发行版本信息。已经升级至Debian 11(bulleye)

cat /etc/os-release
cat /etc/debian_version
lsb_release -a

另外,wsl 下默认安装的debian执行“lsb_release -a”查看发行版本,会提示:“lsb_release: command not found”

需要执行安装 lsb_release

apt-get install -y lsb-release

常见的洗钱方法

常见的洗钱方法有:

  • 旅行支票:海关会对于通关者携带的现金要求申报,未申报者超过限制者没收,但不会对携带旅行支票者做金额的限制,重点在于无背书转让给第三者,因为支票被存入银行兑现,最终会回到原发票人的手中。
  • 在赌场以代币间接兑换:在赌场中兑换成代币,再将代币直接交付给洗钱的受益人。再由他去将代币兑换回现金(通常需要5%左右的手续费),在外可声称在赌场内赌赢的。这样可以避免透过纸钞上的编号直接追查到洗钱的受益人。常用于各国可将代币兑换回现金的职业赌场。
  • 购买已经中奖的彩票或马票:与银行勾结,以高价向得主私下购买已得奖的票券,并公开兑换。
  • 购买无记名债券或期货
  • 购买古董珠宝或具价值收藏品、高价中古精品:利用低买高卖的假买卖,将钱以合法的交易方式,洗到目的账号。此方式亦常用于收贿的收钱方式;或购买具价值的古董珠宝或收藏品,再讹称为自家收藏品在市场上放售,一般会购买没有记号的物品如文物、邮票或历史悠久的名厂乐器。或私下购买多部名车,中古私人飞机,珠宝名牌等高价值物转售。
  • 纸上公司的假买卖:用空壳、信用不良、股份公司做假交易、股票投资、偿还债务等方式洗钱。
  • 购买保险:将大笔金额投保,期间亦可不断提升保金,转换保险计划,待一定年数后取回,届时可疑的因素已遭淡化。
  • 基金会:不肖政客,成立基金会,假捐赠给基金会,诱骗企业捐款,再掏空。企业或财团,利用假捐赠给自己能掌控的基金会,左手搬钱到右手,逃漏所得税。政客或企业利用赈灾名义募款,可是募到的善款私自挪用,或用各种名目扣住善款于私人户头。在跨国洗钱活动中,以各地不同慈善名义的基金会中互相转换款额。
  • 跨国多次转汇与结清旧账户:利用转汇的相关单据有保存期限的漏洞。
  • 直接跨国搬运:利用专机或具有海关免验的身份者,直接把钱搬到外国,常用100美元的纸钞方式运送。
  • 人头账户:由于最怕黑吃黑,怕人头到银行声称存折与提款卡与印章丢失,另行申请新的存折与提款卡并变更印鉴,进行盗领。所以通常用于人头本身所不知的外国开户。
  • 外币活存账户:使用多次小额存款的方式存入,再到外国提领外币。俗称“蚂蚁搬砖”,常配合“人头账户”使用。
  • 跨国交易:常见于无实体商品的产业。利用交易金额造假灌水的方式,先透过合法的方式将金钱汇往外国掮客的账户,再通过外国账户分钱,分清原本的交易金额、掮客的佣金与原本要洗出去的钱;或利用各地的商品贸易,例如以过高金额购买普通消费品,将大量款项汇到国外账户,装作用以支付买货款项。反过来亦可将商品高价出售,让国外的洗钱伙伴将款项汇进国内。
  • 地下汇兑:常见于不肖的卖珠宝金饰的银楼。除了非法兑换外币以外,甚至可将现金兑换为外国的无记名与背书的支票,供客户至外国的账户存入。
  • 跨国企业的资金调度:常见于金融业,银行或保险业等,常以大批的现金纸钞进行跨国搬运。例如以麻绳捆绑、纸箱方式搬运。
  • 百货公司的礼券:具有高度的流通性,但由于具有不易兑换回现金的特性,故需有一定的人脉,才方便消化礼券。例如转卖给各公司的员工福利机构,将礼券做为其各公司员工的节假日奖金方式发放。就这样把礼券洗到不知情的第三者手中,原礼券持有人则取回接近等值的现金。
  • 人头炒楼:使用人头购买房地产,向承包商或开发商以市价五至七折买入,以现金支付。然后在短期内快速脱手(例如预售屋在交屋前),获利约50%-100%。
  • 假借贷:常用于收贿或贪污。收钱的人持有对方开立的远期兑现的本票或支票。即使被查到这张本票或支票,可声称为借贷关系。等风头过了或不在其位,没有明显的对价关系时,再把本票或支票转手给第三者,或是扎进银行兑现。或是贪污被揭发的人说要还钱,但开立本票或支票,只要没有兑现,就没有真正的还钱。
  • 伪币或伪钞:将伪币或伪钞,通过多次小金额消费行为,或是利用自动贩卖机找零行为,或是纸钞兑换成硬币的机器。将伪币或伪钞洗成真钱。
  • 黑道:购入价值的毒品贩毒、地下枪械等。将赃款转嫁给他人。
  • 比特币(Bitcoin)等加密货币:基于比特币等加密货币的匿名性,且可自由、不记名的产生不同的比特币钱包,搭配混币服务,难以追踪真实身份,是近年来常见的洗钱工具。
  • 第三方或者第四方支付平台:部分第三方支付平台存在账户未实名注册、管理不规范等问题,致使一些账号可以在网络上直接买卖,部分平台沦为电信诈骗团伙套取、漂白非法资金的“绿色通道”。诈骗团伙利用第三方支付平台转移赃款和洗钱的手段一般有3种:通过第三方支付平台发行的商户POS机虚构交易套现;将诈骗得手的资金转移到第三方支付平台账户,在线购买游戏点卡、比特币等物品后转卖套现;将赃款在银行账户和第三方支付平台之间多次转账切换,逃避公安追查。

Windows下 NTP时间服务器设置

NTP时间服务器
pool.ntp.org: public ntp time server : https://www.ntppool.org/zh/

pool.ntp.org 是一个以时间服务器的大虚拟集群为上百万的客户端提供可靠的 易用的 网络时间协议(NTP)服务的项目

NTP池正在为世界各地成百上千万的系统提供服务。 它是绝大多数主流Linux发行版和许多网络设备的默认“时间服务器”


国内NTP服务 http://ntp.org.cn/pool.php

设置

Windows 可以使用系统内置的ntp客户端: 以管理员权限在命令行运行如下指令:

w32tm /config /syncfromflags:manual /manualpeerlist:"0.pool.ntp.org 1.pool.ntp.org 2.pool.ntp.org 3.pool.ntp.org"

这在Windows 2003及之后的版本中被支持。 如果您使用旧版的Windows,您可以尝试如下指令:

net time /setsntp:"0.pool.ntp.org 1.pool.ntp.org 2.pool.ntp.org"

作为管理员,右键任务栏的时钟,选择“更改日期和时间设置…”,并且在“Internet时间”选项卡下输入服务器名也能达到同样的效果。

免费SSL证书 – Let’s Encrypt 与 certbot 延期

给网站加了SSL,用的 Let’s Encrypt 。后来看有效期只有90天,官网推荐用 certbot  延期,开始感觉挺麻烦,但看到一篇文章,写的很好,转贴留存一下!

文章出自:https://ksmx.me/letsencrypt-ssl-https/

现在用 Let’s EncryptStartSSL 的免费证书有效期是1年,1年后需要手动更换。配置过程还挺麻烦的。

更推荐 Let’s Encrypt,虽然有效期只有3个月,但可以用 certbot 自动续期,完全不受影响。而且 Let’s Encrypt 因为有了 certbot 这样的自动化工具,配置管理起来非常容易。

生成 Let’s Encrypt 证书

Let’s Encrypt 证书生成不需要手动进行,官方推荐 certbot 这套自动化工具来实现。3步轻松搞定:

  1. 下载安装 certbot (Let’s Encrypt项目的自动化工具)
  2. 创建配置文件
  3. 执行证书自动化生成命令

下面的教程运行在 Arch Linux 上,其他操作系统也大同小异。你可以在 certbot 网站上,选择你的 Web Server 和 操作系统,就能看到对应的安装和配置教程。

1. 下载安装 certbot

在 Arch Linux 上,安装很简单:

$ sudo pacman -Syu
$ sudo pacman -S certbot

2. 创建配置文件

先创建存放配置文件的文件夹:

$ sudo mkdir /etc/letsencrypt/configs

编辑配置文件:

$ sudo vim /etc/letsencrypt/configs/example.com.conf

把 example.com 替换成自己的域名,配置文件内容:

# 写你的域名和邮箱
domains = example.com
rsa-key-size = 2048
email = your-email@example.com
text = True

# 把下面的路径修改为 example.com 的目录位置
authenticator = webroot
webroot-path = /var/www/example

这里需要解释一下,上面配置文件用了 webroot 的验证方法,这种方法适用于已经有一个 Web Server 运行中的情况。certbot 会自动在 /var/www/example 下面创建一个隐藏文件 .well-known/acme-challenge ,通过请求这个文件来验证 example.com 确实属于你。外网服务器访问 http://www.example.com/.well-known/acme-challenge ,如果访问成功则验证OK。

我们不需要手动创建这个文件,certbot 会根据配置文件自动完成。

3. 执行证书自动化生成命令

一切就绪,我们现在可以运行 certbot 了。

$ sudo certbot -c /etc/letsencrypt/configs/example.com.conf certonly

## 片刻之后,看到下面内容就是成功了
IMPORTANT NOTES:
 - Congratulations! Your certificate and chain have been saved at /etc/letsencrypt/live/example.com/fullchain.pem.

如果运行顺利,所有服务器所需要的证书就已经生成好了。他们被放在了 /etc/letsencrypt/live/example.com/ 下:

$ ls /etc/letsencrypt/live/example.com/
cert.pem #server cert only
privkey.pem #private key
chain.pem #intermediates
fullchain.pem #server cert + intermediates

配置 Nginx 加入证书

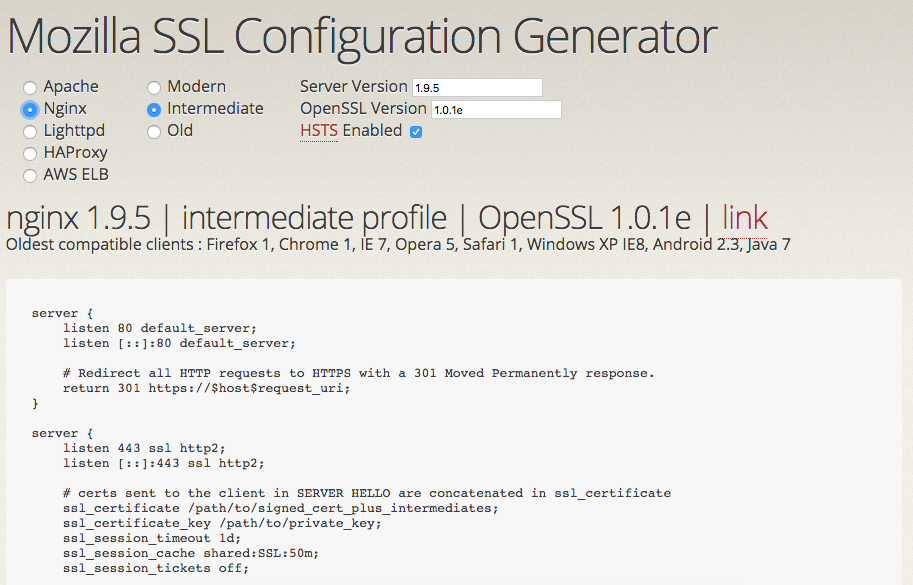
到这里已经成功一大半了,只需要配置 Nginx 支持刚刚生成的证书。而且这个配置有最佳实践可以参考,访问:Mozilla SSL Configuration Generator,这是 Mozilla 搞得一个 HTTPS 配置文件自动生成器,支持 Apache,Nginx 等多种服务器。按照这个配置文件,选择 Intermediate 的兼容性。这里生成的配置文件是业界最佳实践和结果,让 Nginx 打开了各种增加安全性和性能的参数。

默认配置文件是这样的:

server {
    listen 80 default_server;
    listen [::]:80 default_server;

    # Redirect all HTTP requests to HTTPS with a 301 Moved Permanently response.
    return 301 https://$host$request_uri;
}

server {
    listen 443 ssl http2;
    listen [::]:443 ssl http2;

    # certs sent to the client in SERVER HELLO are concatenated in ssl_certificate
    ssl_certificate /path/to/signed_cert_plus_intermediates;
    ssl_certificate_key /path/to/private_key;
    ssl_session_timeout 1d;
    ssl_session_cache shared:SSL:50m;
    ssl_session_tickets off;

    # Diffie-Hellman parameter for DHE ciphersuites, recommended 2048 bits
    ssl_dhparam /path/to/dhparam.pem;

    # intermediate configuration. tweak to your needs.
    ssl_protocols TLSv1 TLSv1.1 TLSv1.2;
    ssl_ciphers 'ECDHE-ECDSA-CHACHA20-POLY1305:ECDHE-RSA-CHACHA20-POLY1305:ECDHE-ECDSA-AES128-GCM-SHA256:ECDHE-RSA-AES128-GCM-SHA256:ECDHE-ECDSA-AES256-GCM-SHA384:ECDHE-RSA-AES256-GCM-SHA384:DHE-RSA-AES128-GCM-SHA256:DHE-RSA-AES256-GCM-SHA384:ECDHE-ECDSA-AES128-SHA256:ECDHE-RSA-AES128-SHA256:ECDHE-ECDSA-AES128-SHA:ECDHE-RSA-AES256-SHA384:ECDHE-RSA-AES128-SHA:ECDHE-ECDSA-AES256-SHA384:ECDHE-ECDSA-AES256-SHA:ECDHE-RSA-AES256-SHA:DHE-RSA-AES128-SHA256:DHE-RSA-AES128-SHA:DHE-RSA-AES256-SHA256:DHE-RSA-AES256-SHA:ECDHE-ECDSA-DES-CBC3-SHA:ECDHE-RSA-DES-CBC3-SHA:EDH-RSA-DES-CBC3-SHA:AES128-GCM-SHA256:AES256-GCM-SHA384:AES128-SHA256:AES256-SHA256:AES128-SHA:AES256-SHA:DES-CBC3-SHA:!DSS';
    ssl_prefer_server_ciphers on;

    # HSTS (ngx_http_headers_module is required) (15768000 seconds = 6 months)
    add_header Strict-Transport-Security max-age=15768000;

    # OCSP Stapling ---
    # fetch OCSP records from URL in ssl_certificate and cache them
    ssl_stapling on;
    ssl_stapling_verify on;

    ## verify chain of trust of OCSP response using Root CA and Intermediate certs
    ssl_trusted_certificate /path/to/root_CA_cert_plus_intermediates;

    resolver <IP DNS resolver>;

    ....
}

请根据自己的服务配置修改和添加内容,重点只需要关注6行

server {
	listen 443 ssl http2;
	....
	ssl_certificate /etc/letsencrypt/live/example.com/fullchain.pem;
	ssl_certificate_key /etc/letsencrypt/live/example.com/privkey.pem;
	ssl_dhparam /etc/nginx/ssl/dhparam.pem;

	ssl_trusted_certificate /etc/letsencrypt/live/example.com/root_ca_cert_plus_intermediates;

	resolver <IP DNS resolver>;
	....
}

这6行中,部分文件还不存在,逐个说明。

首先是第一行 listen 443 ssl http2; 作用是启用 Nginx 的 ngx_http_v2_module 模块 支持 HTTP2,Nginx 版本需要高于 1.9.5,且编译时需要设置 --with-http_v2_module 。Arch Linux 的 Nginx 安装包中已经编译了这个模块,可以直接使用。如果你的 Linux 发行版本中的 Nginx 并不支持这个模块,可以自行 Google 如何加上。

ssl_certificate 和 ssl_certificate_key ,分别对应 fullchain.pem 和 privkey.pem,这2个文件是之前就生成好的证书和密钥。

ssl_dhparam 通过下面命令生成:

$ sudo mkdir /etc/nginx/ssl
$ sudo openssl dhparam -out /etc/nginx/ssl/dhparam.pem 2048

(可选)ssl_trusted_certificate 需要下载 Let’s Encrypt 的 Root Certificates,不过根据 Nginx 官方文档 所说,ssl_certificate 如果已经包含了 intermediates 就不再需要提供 ssl_trusted_certificate,这一步可以省略:

$ cd /etc/letsencrypt/live/example.com
$ sudo wget https://letsencrypt.org/certs/isrgrootx1.pem
$ sudo mv isrgrootx1.pem root.pem
$ sudo cat root.pem chain.pem > root_ca_cert_plus_intermediates

resolver 的作用是 “resolve names of upstream servers into addresses”, 在這個配置中,resolver 是用來解析 OCSP 服務器的域名的,建议填写你的 VPS 提供商的 DNS 服务器,例如我的 VPN 在 Linode,DNS服务器填写:

resolver 106.187.90.5 106.187.93.5;

Nginx 配置完成后,重启后,用浏览器测试是否一切正常。

$ sudo systemctl restart nginx

这时候你的站点应该默认强制使用了 HTTPS,并且浏览器地址栏左边会有绿色的小锁:

自动化定期更新证书

Let’s Encrypt 证书有效期是3个月,我们可以通过 certbot 来自动化续期。

在 Arch Linux 上,我们通过 systemd 来自动执行证书续期任务。

$ sudo vim /etc/systemd/system/letsencrypt.service
[Unit]
Description=Let's Encrypt renewal

[Service]
Type=oneshot
ExecStart=/usr/bin/certbot renew --quiet --agree-tos
ExecStartPost=/bin/systemctl reload nginx.service

然后增加一个 systemd timer 来触发这个服务:

$ sudo vim /etc/systemd/system/letsencrypt.timer
[Unit]
Description=Monthly renewal of Let's Encrypt's certificates

[Timer]
OnCalendar=daily
Persistent=true

[Install]
WantedBy=timers.target

启用服务,开启 timer:

$ sudo systemctl enable letsencrypt.timer
$ sudo systemctl start letsencrypt.timer

上面两条命令执行完毕后,你可以通过 systemctl list-timers 列出所有 systemd 定时服务。当中可以找到 letsencrypt.timer 并看到运行时间是明天的凌晨12点。

在其他 Linux 发行版本中,可以使用 crontab 来设定定时任务,自行 Google 吧。

用专业在线工具测试你的服务器 SSL 安全性

Qualys SSL Labs 提供了全面的 SSL 安全性测试,填写你的网站域名,给自己的 HTTPS 配置打个分。

如果你完全按照我上面教程配置,遵循了最佳实践,你应该和我一样得分是 A+

一些文件比对和合并的资料

(最近整理一下)

FC

(CMD命令行)

The fc command has been included in Microsoft operating systems since MS-DOS 3.3 and is included in all versions of Microsoft Windows.

C:\Users\Administrator>fc /?

比较两个文件或两个文件集并显示它们之间

的不同

FC [/A] [/C] [/L] [/LBn] [/N] [/OFF[LINE]] [/T] [/U] [/W] [/nnnn]
    [drive1:][path1]filename1 [drive2:][path2]filename2
FC /B [drive1:][path1]filename1 [drive2:][path2]filename2

  /A         只显示每个不同处的第一行和最后一行。
   /B         执行二进制比较。
   /C         不分大小写。
   /L         将文件作为 ASCII 文字比较。
   /LBn       将连续不匹配的最大值设置为指定
              的行数。
   /N         在 ASCII 比较上显示行数。
   /OFF[LINE] 不要跳过带有脱机属性集的文件。
   /T         不要将制表符扩充到空格。
   /U         将文件作为 UNICODE 文本文件比较。
   /W         为了比较而压缩空白(制表符和空格)。
   /nnnn      指定不匹配处后必须连续
              匹配的行数。
   [drive1:][path1]filename1
              指定要比较的第一个文件或第一个文件集。
   [drive2:][path2]filename2
              指定要比较的第二个文件或第二个文件集。

COMP

(CMD命令行)

A newer command, fc was added in DOS 3.3 which allows for line comparisons in addition to binary comparisons.

C:\Users\Administrator>comp /?

比较两个文件或两个文件集的内容。

COMP [data1] [data2] [/D] [/A] [/L] [/N=number] [/C] [/OFF[LINE]]

  data1      指定要比较的第一个文件的位置和名称。
   data2      指定要比较的第二个文件的位置和名称。
   /D         以十进制格式显示差异。
   /A         以 ASCII 字符显示差异。
   /L         显示不同的行数。
   /N=number  只比较每个文件中第一个指定的行数。
   /C         比较文件时 ASCII 字母不区分大小写。
   /OFF[LINE] 不要跳过带有脱机属性集的文件。

要比较文件集,请在 data1 和 data2 参数中使用通配符。

——————————-

GNU DiffUtils for Windows

(CMD命令行)

显示文件之间的差异

http://gnuwin32.sourceforge.net/packages/diffutils.htm

——————————-

Diff Text – The Online Compare Plain Text & Find Differences Web Page

http://www.diff-text.com/

WinMerge

(桌面程序)

Windows visual diff and merge for files and directories

https://sourceforge.net/projects/winmerge/

Selection Diff Tool

(Web程序)

Microsoft Office 2013 app which reports the differences between two blocks of plain text.

Note: This will not work with previous versions of Office.

https://store.office.com/zh-cn/app.aspx?assetid=WA103863850&ui=zh-CN&rs=zh-CN&ad=CN&appredirect=false

The XML Diff and Patch GUI Tool

https://msdn.microsoft.com/en-us/library/aa302295.aspx

shtml中的脚本 – SSI 服务器端包含 (Server Side Includes)

服务器端包含


介绍

服务器端包含(Server Side Includes),通常简称为SSI,是HTML页面中的指令,在页面被提供时由服务器进行运算,以对现有HTML页面增加动态生成的内容,而无须通过CGI程序提供其整个页面,或者使用其他动态技术。

对什么时候用SSI,而什么时候用某些程序生成整个页面的权衡,取决于页面中有多少内容是静态,有多少内容需要在每次页面被提供时重新计算。SSI是一种增加小段信息的好方法,诸如当前时间。如果你的页面大部分是在被提供时生成的,那就要另找方案了。

。将服务器信息添加到一个 HTML 文档。包括以下的形式:

<!--#command variablename="value"-->
Whether or not you can use SSI on your site depends on your provider. Ask your favourite support person if you can use SSI, what server software is used and if there are any special techniques, conditions or rules. For example, on my site I can only use SSI in files that have an .shtml extension instead of the normal .html one. You also have to ask what path to files to use.

Unfortunately, not all includes explained here work for all servers. For example, the #hide and #show includes are specific to WebStar. With Apache server software, you can achieve the same things by using #if and #endif.

更改时间格式

Before starting to use server side includes, you need to configure a number of things. For starters, choose a format for date and time you like (the #echo command is explained later in this chapter).

<!–#config timefmt=”%A, %d %B %Y at %H:%M:%S”–>
<!–#echo var=”date_gmt”–>

Below is a table of many of the options you can use. You can also include things like colons, commas and slashes as well as bits of text and HTML. You can mix the elements below at will.

Element Value Example
%a Abbreviated day of the week Sun
%A Day of the week Sunday
%b Abbreviated month name Jan
%B Month in full January
%d Date 1 (and not 01)
%H 24-hour clock hour 13
%I 12-hour clock hour 1
%j Decimal day of the year 360
%m Month number 11
%M Minutes 08
%p AM or PM AM
%S Seconds 09
%U Week of the year (also %W) 49
%w Day of the week number 05
%y Year of the century 95
%Y Year 1995
%Z Time zone EST

Here are some more examples of different formats:

<!–#config timefmt=”Week %U of %y”–>
<!–#echo var=”date_gmt”–>

<!–#config timefmt=”%d/%m/%y, day %j of the year”–>
<!–#echo var=”date_gmt”–>

<!–#config timefmt=”%I:%S %p”–>
<!–#echo var=”date_gmt”–>

The last format you have set will remain valid throughout the rest of the page. However, unless you want to use the default format (which usually is something like 98/07/12:16:45:34) you will have to set your favourite time format in every page that uses server side includes that have to do with time.

更改大小格式

You can also specify the way file sizes are displayed.

<!–#config sizefmt=”bytes”–>
<!–#fsize file=”top.gif”–>
<!–#config sizefmt=”abbrev”–>
<!–#fsize file=”top.gif”–>


The #fsize include is explained later in this chapter. You can see that the “bytes” option gives the size in full in bytes, the “abbrev” option gives the size in kilobytes.

自定义错误消息

You can change the default error message to anything you want. Here is an example of changing the error message and then trying to include the non-existent file “nosuchfile.html”:

<!–#config errmsg=”Sorry, an error occurred. Please mail your complaints to webmaster@somewhere.net”–>

<!–#include file=”nosuchfile.html”–>

There is only one error message available. However, you can change the error message more than once in a single html file:

<!–#config errmsg=”Sorry, an error occurred including nosuchfile.html. Please mail your complaints to webmaster@somewhere.net”–>

<!–#include file=”nosuchfile.html”–>

<!–#config errmsg=”Sorry, an error occurred including nosuchfileagain.html. Please mail your complaints to webmaster@somewhere.net”–>

<!–#include file=”nosuchfileagain.html”–>

Specifying your own error messages will make it easier for you to spot and solve problems. If you want to use more than one error message, you have to make sure that you change the error message before the command it refers to.

包括文件

The include command allows you to dynamically insert other HTML files into the current HTML file. Use it like this:

<!–#include file=”file.shtml”–>

What path to use, again, depends on your provider. Normally it will be a path that is local to the server, so it will not include http://etc. The most sensible use of this command is to take standard bits of your pages such as headers and footer and put them in a separate file. On all of your pages you use the include command to include that file. That way, in order to change the footer on all pages, you only need to change one file. For example, you could make a simple text file that contains:

<P ALIGN=”center”>Copyright 1998 Tom, Dick and Harry<BR>
Please mail us at tom.dick@harry.com</P

You save this file as ssifooter.html and include it in your other files by using:

<!–#include file=”ssifooter.html”–>

The files you include can be plain text files or can include HTML. You don’t need to give them <HEAD> and <BODY> tags, just put in whatever you want to insert. In these files you can use whatever HTML you want and you can make links, etc.

隐藏 / 显示

With the Hide and Show commands you can avoid that your reader sees certain parts of the document:

<P>Now you see me, <!–#hide–> This text is not shown. <!–#show–> now you don’t.</P

Show and Hide can be used to temporary exclude parts of your document. Hide and Show only work under WebStar, so I cannot show you an example here.

根据时间隐藏和显示

The next example shows how to display bits of HTML only after certain days. Comparisons like this always use the default time format of 1998/07/24:17:34:45 no matter what you have done with the timefmt option.

<!–#hide–>
<!–#show after=”1998/06/30″–>
This text is shown after 30 June 1998.
<!–#show–>

<!–#hide–>
<!–#show after=”1999/06/30″–>
This text is shown after 30 June 1999.
<!–#show–>

Or you can show and hide things on specific days using a combination of ‘hide after’ and ‘show after’:

<!–#hide–>
<!–#show during=”1998/07/12″–>
This text is shown on 12 July 1998.
<!–#show–>

<!–#hide–>
<!–#show during=”1998/07/13″–>
This text is shown on 13 July 1998.
<!–#show–>

<!–#hide–>
<!–#show during=”1998/07/14″–>
This text is shown on 14 July 1998.
<!–#show–>

As you can see, you do not have to specify a full date and time but only what is relevant for you. If you would want to show something during 1998 you could use: during=”1998″.

依据时间隐藏和显示

Here is an example of how to show a bit of text only to a user of Netscape’s Navigator:

<!–#hide–>
<!–#show var=”http_user_agent” operator=”contains”
value=”nav”–>
Welcome Netscape Navigator user!
<!–#show–>

<!–#hide–>
<!–#show var=”http_user_agent” operator=”contains”
value=”MSIE”–>
Welcome Internet Explorer user!
<!–#show–>

As you can see in this example, the output of Webstar is by default on. That’s why you start any of these examples by switching the output of (#hide) and then switching it on again if the appropriate condition is fulfilled. At the end of the example you switch the output on again with a #show include. Again, show and hide do not work under Apache so I cannot show you the result here.

随机隐藏和显示

Show and Hide can also be used at random:

<!–#hide–>
<!–#show var=”random” op=”<” value=”50″ –>
Heads
<!–#hide–>
<!–#show var=”random” op=”=>” value=”50″ –>
Tails
<!–#show–>

If you do a couple of reloads, you should see the text change. Of course you can use the same thing to show and hide images or any other HTML. The number that is used by Webstar is a random number ranging from 1 to 99 inclusive. Here is an example for three random texts:

<!–#hide–>
<!–#show var=”random” op=”<” value=”33″ –>
To be or not to be,
<!–#hide–>
<!–#show var=”random” op=”=>” value=”34″ –>
<!–#hide var=”random” op=”>” value=”66″ –>
that’s the question,
<!–#hide–>
<!–#show var=”random” op=”>” value=”66″ –>
my dear Watson.
<!–#show–>

更多的隐藏和显示

In fact you can show and hide text at will using any of the environment variables (see the section on Echo below). This example shows a bit of text to a user with IP address 195.99.40.125:

<!–#hide–>
<!–#show var=”remote_addr” operator=”=” value=”195.99.40.125″–>
Welcome BTinternet user!
<!–#show–>

If you have friends with fixed IP addresses you can leave messages especially for them in the same manner. Finally, you should know which operators are available:

Operator Meaning
“contains” or “con” variable contains the value string
“starts with” or “start” variable starts with the value string
“ends with” or “end” variable ends with the value string
“=” or “==” variable equals the value string
“!=” or “<>” variable does not equal the value string
“<“ variable is less than the value string
“<=” or “=<“ variable is less than or equal to the value string
“>” variable is greater than the value string
“>=” or “=>” variable is greater than or equal to the value string

If 和 Endif

Because this server runs Apache I could not show the examples of #hide and #show. I can, however, demonstrate the #if and #endif includes (if and endif, in turn, do not work under Webstar):

<!–#config timefmt=”%A”–>
<!–#if expr=”$date_gmt = Friday” –>
Hang in there, it’s almost weekend
<!–#elif expr=”($date_gmt = Saturday) || ($date_gmt = Sunday)” –>
Have a nice weekend
<!–#else –>
Have a good day
<!–#endif –>

Hang in there, it’s almost weekend Have a nice weekend Have a good day

The first thing you will notice is that the #if include, opposite to the #hide and #show, does use the date as formatted with timefmt. This has some clear advantages. You can also see that this example is a bit easier to understand the #show and #hide spaghetti that WebStar seems to need. Note that the #if and #endif are obligatory, the #elif and #else are optional. This example uses date_gmt which is London time -ignoring summertime- rather than date_local which depends on where the server is.

The following operators are available:

Operator Meaning
string1 = string2 string1 equals string2
string1 != string2 string1 does not equal string2
string1 < string2 string1 is less than string2
string1 <= string2 string1 is less than or equal to string2
string1 > string2 string1 is greater than string2
string1 >= string2 string1 is greater than or equal to string2

If, Endif 和环境变量

you can use the #if include to show different information to different browsers. Each browser sets the environment variable http_user_agent differently. This is how Netscape Navigator 4.04, Microsoft Internet Exploder and Apple’s Cyberdog respectively do it:

Mozilla/4.04 (Macintosh; I; PPC, Nav)
Mozilla/4.0 (compatible; MSIE 4.0; Mac_PowerPC)
Cyberdog/2.0 (Macintosh; PPC)

As you can see these are all the Macintosh versions. By the way, this is what your own browser makes of http_user_agent: . So this is how to show different information to different browsers:

<!–#if expr=”$HTTP_USER_AGENT=/MSIE/ ” –>
Fight the Microsoft Monopoly. Get Netscape!
<!–#elif expr=”$HTTP_USER_AGENT=/Nav/ ” –>
Welcome Netscape Navigator user!
<!–#elif expr=”$HTTP_USER_AGENT=/Cyberdog/ ” –>
Welcome Apple Cyberdog user!
<!–#else –>
Welcome! So what browser are you using?
<!–#endif –>

Fight the Microsoft Monopoly. Get Netscape! Welcome Netscape Navigator user! Welcome Apple Cyberdog user! Welcome! So what browser are you using?

Note that the /Nav/ I am looking for here is produced by Netscape Navigator, which is Communicator without the news, mail and webeditor modules. The above is obviously not an exhaustive list of browsers, which is why there is also an #else include for all the browsers that are not covered.

The two slashes around MSIE, Nav and Cyberdog in the example above means that the second string is interpreted as a regular expression, commonly used under Unix. In this case it checks if http_user_agent contains that string.

Set

The #set include can be used to create your own variables and assign them a value. Variables can be printed or can be used in #if statements:

<!–#set var=”carmodel” value=”Mercedes” –>
<!–#echo var=”carmodel” –><BR>
<!–#if expr=”$carmodel = Mercedes” –>
That’s a jolly nice car
<!–#endif –>


That’s a jolly nice car

The $ sign in the #if include is needed to ensure that “carmodel” is interpreted as a variable, not as a string.

Echo

ECHO can be used to insert information from the browser and the server into your document, the so-called environment variables. The following possibilities are available:

Document Name: <!–#echo var=”document_name”–>
Document URI: <!–#echo var=”document_uri”–>
Local Date: <!–#echo var=”date_local”–>
GMT Date: <!–#echo var=”date_gmt”–>
Last Modified: <!–#echo var=”last_modified”–>
Server Software: <!–#echo var=”server_software”–>
Server Name: <!–#echo var=”server_name”–>
Server Protocol: <!–#echo var=”server_protocol”–>
Server Port: <!–#echo var=”server_port”–>
Gateway Interface: <!–#echo var=”gateway_interface”–>
Request Method: <!–#echo var=”request_method”–>
Script Name: <!–#echo var=”script_name”–>
Remote Host: <!–#echo var=”remote_host”–>
Remote Address: <!–#echo var=”remote_addr”–>
Remote User: <!–#echo var=”remote_user”–>
Content Type: <!–#echo var=”content_type”–>
Content Length: <!–#echo var=”content_length”–>
HTTP Accept: <!–#echo var=”http_accept”–>
HTTP User Agent (Browser): <!–#echo var=”http_user_agent”–>
HTTP Cookie: <!–#echo var=”http_cookie”–>
Unescaped query string: <!–#echo var=”query_string_unescaped”–>
Query String: <!–#echo var=”query_string”–>
Path Info: <!–#echo var=”path_info”–>
Path Translated: <!–#echo var=”path_translated”–>
Referer: <!–#echo var=”referer”–>
Forwarded: <!–#echo var=”forwarded”–>

Document Name:
Document URI:
Local Date:
GMT Date:
Last Modified:
Server Software:
Server Name:
Server Protocol:
Server Port:
Gateway Interface:
Request Method:
Script Name:
Remote Host:
Remote Address:
Remote User:
Content Type:
Content Length:
HTTP Accept:
HTTP User Agent (Browser):
HTTP Cookie:
Unescaped query string:
Query String:
Path Info:
Path Translated:
Referer:
Forwarded:

Not all ECHO commands always result in information being printed. This can depend on the server, on your browser and on the way you reached this page. The #echo include works both under WebStar and Apache.

Print Environment

If you want to print the entire environment, you do not need to use a whole list of #echo includes. Instead you can use this shortcut.

<PRE> <!–#printenv –> </PRE>


Note that the environment includes the variable “carmodel” that was defined in an earlier example.

执行脚本

You can use a server side include to run a script. This is what I use on my homepage:

<!–#exec cgi=”ssi.demo.cgi”–>

The CGI script (which is in Perl 5) opens a file with a dozen quotes, selects one at random and prints it to the page. The script, by the way, is courtesy of Matt Wright who offers a brilliant collection of scripts.

文件大小

You can insert the size of a file in this way:

<!–#fsize file=”top.gif”–>

This inserts the size of the file top.gif (the logo at the top of this page). As explained earlier in this chapter, you can determine if the size is displayed in full bytes or abbreviated in kilobytes or megabytes.

文件日期

You can insert the date of a file in this way:

<!–#flastmod file=”top.gif”–>

This inserts the date and the time the file top.gif (the logo at the top of this page) was last modified. The format of the date and time can be customized by you as explained earlier in this chapter.

This page has been translated into Spanish language by Maria Ramos from Webhostinghub.com.


Google搜索技巧

搜索引擎在今天其实就是使用网络的基本功,也是在线一切工作的得力助手。
而很多人依然不知道如何使用搜索引擎查找想要的东西,经常会有人打电话问你帮他找些什么。
所以把这个谷歌文档发给他就可以了。

了解一些帮助您轻松通过 Google 找到信息的提示和技巧。

提示 1:使用简单的搜索字词

无论要搜索什么,都请先用简单的字词进行搜索,例如最近的机场在哪里?您随时可以根据需要添加一些描述性字词。

如果您要查找特定地点的某个场所或商品,可添加该地点名称。例如,南京面包店

提示 2:通过语音搜索

不想打字?点击 Google 应用或 Chrome 搜索框中的麦克风图标 ,通过语音执行搜索

提示 3:认真选择措辞

在确定输入搜索框中的字词时,尽量选择要查找的网站上可能会出现的字词。例如,不要使用我的头很痛,而要使用头痛,因为医学网站上往往会使用后者。

提示 4:不用担心输入方面的琐事

  • 拼写。 无论您的拼写是否正确,Google 的拼写检查工具都会自动使用给定字词的最常用拼写形式。
  • 大写。 搜索 QQqq 所得到的结果是一样的。

提示 5:查找快速解答

对于您进行的许多搜索,Google 都会替您完成相关工作,并会在您输入搜索字词后在搜索结果页上显示相关解答。有些功能(例如查询与球队有关的信息)并非在所有地区都提供。

  • 天气:搜索天气可查看您所在地点的天气信息,如果在“天气”后加上城市名(例如天气北京),则可查看相应城市的天气信息。
  • 字典:在任意字词前加上 define 即可查询其定义。
  • 计算:输入数学公式(例如 3*9123)或求解复杂的图形公式。
  • 单位换算:输入任何换算内容,例如 3 美元兑换欧元
  • 体育:搜索球队的名称,即可查看相关赛程和比赛得分等信息。
  • 快讯:搜索名人、地点、电影或歌曲的名称可看到相关重要信息。

搜索中的标点、符号和运算符

您可以使用特殊的字符和字词来获取更具体的搜索结果。Google 会忽略大部分的标点符号(以下示例除外)。例如,搜索字词狗! 会被 Google 视为

Google 搜索可以识别的标点和符号

即使以下符号均受支持,在您的搜索中加入这些符号也并不一定会改善搜索结果。如果我们认为该标点不会为您提供更好的结果,则会显示出不含标点的搜索字词所对应的建议结果。

请注意:在使用符号进行搜索时,请勿在符号和搜索字词之间添加空格。我们可以识别-狗中的符号,但无法识别- 狗中的符号。

符号 用途
+ 搜索 Google+ 网页或血型 示例:+Chrome 和 AB+
@ 查找社交标记 示例:@agoogler
$ 查找价格
示例:尼康 $400
# 查找热门主题标签以搜索热门话题 示例:#throwbackthursday
- 移除字词在某个字词或网站之前添加一个短横可排除所有包含该字词或网站的搜索结果。在搜索有多种含义的字词(例如“汽车品牌捷豹”和“动物捷豹”)时,这种方法尤为实用。

示例:捷豹速度 -汽车熊猫 -site:wikipedia.org

连字如果多个字词以短横相连,Google 便会知道这些字词是紧密关联的。

示例:twelve-year-old dog

_ 用于连接两个字词,例如 quick_sort。 您会在搜索结果中发现,这对字词要么组成一个字词 (quicksort),要么由下划线相连 (quick_sort)。
" 如果您将字词或词组置于引号中,则搜索结果中将仅显示以下网页:包含引号中的字词且字词顺序也与引号中相同。 请注意:请仅在需要搜索某个精确字词或词组时使用这种搜索方式,不然,可能会错误地排除掉很多有用的搜索结果。 示例:"想象一下所有人"
* 在搜索中添加一个星号,以表示任何未知或不确定的字词。与引号结合使用,可以查找具体词组的不同变体,或记住词组中间的字词。 示例:"省*就是赚*"
.. 使用不含空格的两个半角句号 (..) 隔开多个数字,即可查看日期、价格和尺寸等方面的数值在指定范围内的搜索结果。 示例:相机 $50..$100

使用搜索运算符缩小搜索结果范围

搜索运算符是可添加到搜索字词中以帮助缩小搜索结果范围的字词。不必担心,您不一定要记住每个运算符,因为您也可以使用“高级搜索”页面来进行这种搜索。

请注意:使用运算符进行搜索时,请勿在运算符和搜索字词之间添加空格。搜索 site:nytimes.com 可以获取相关搜索结果,而搜索 site: nytimes.com 则是行不通的。

运算符 用途
site: 仅从特定网站或网域获得搜索结果。例如,您可以查找 NBC 网站或任何 .gov 网站上所有提到“奥运”的内容。 示例:olympics site:nbc.com 和 olympics site:.gov
link: 查找链接到某个特定网页的页面。例如,您可以查找链接到 google.com.hk 的所有页面。 示例:link:google.com.hk
related: 查找与您已浏览过的网址类似的网站。当您搜索与 time.com 相关的网站时,会找到您可能感兴趣的其他新闻出版物网站。 示例:related:time.com
OR 如果您想搜索可能只包含多个搜索字词中某一个的页面,可以在这些字词之间加上 OR(大写)。如果不加 OR,您的搜索结果中通常只会显示与这些字词都匹配的页面。 示例:世界杯举办地2014年OR 2018年
info: 获取某网址的相关信息,包括网页的缓存版本、相似网页和链接至该网站的网页。 示例:info:google.com
cache: 查看 Google 上次抓取网站时网页的外观。 示例:cache:washington.edu

继续阅读“Google搜索技巧”

修改启动 Windows 服务时允许花费的时间

今天安装 Team Foundation Server。

20140725163301

在安装结果信息中有点以为的收获:
信息

启动 Windows 服务时允许花费的时间已从 30 秒增加为 600 秒。这会影响此服务器上的所有 Windows 服务。(注册表值设置是 HKLM\SYSTEM\CurrentControlSet\Control\!ServicesPipeTimeout。)

通过设置此注册表键值,调整加载服务所允许使用的时间。