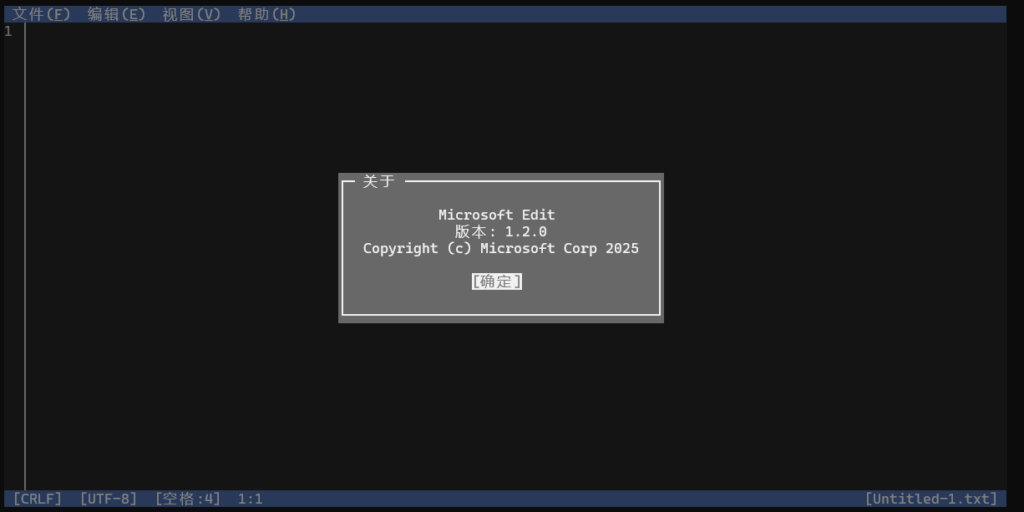
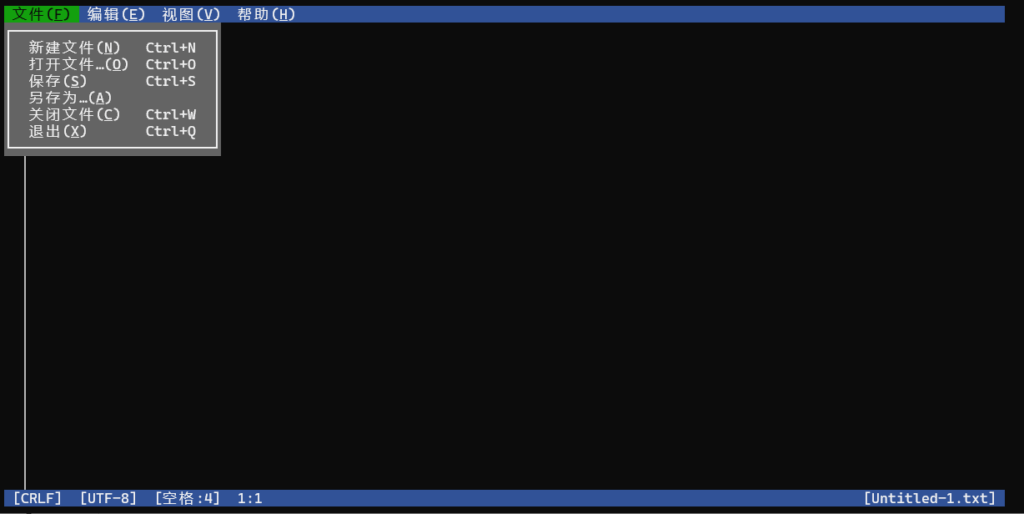
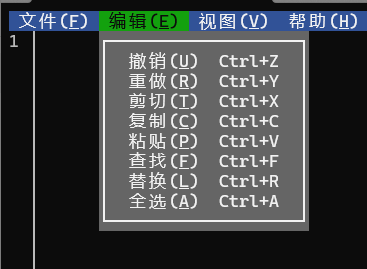
New File:Ctrl+N Open File:Ctrl+0 Save:Ctrl+s Close Editor:Ctrl+W Exit:Ctrl+Q Undo:Ctrl+Z Redo:Ctrl+Y Cut:Ctrl+x Copy:Ctrl+c Paste:Ctrl+V Find:Ctrl+F Replace:Ctrl+R
wget https://github.com/rqlite/rqlite/releases/download/v7.0.0/rqlited-v7.0.0-linux-amd64.tar.gz
tar -xzvf rqlited-v7.0.0-linux-amd64.tar.gz
cd rqlited-v7.0.0-linux-amd64
CREATE TABLE http_table (
    id       INTEGER PRIMARY KEY AUTOINCREMENT,
    Host     TEXT    DEFAULT "",
    IP       TEXT    DEFAULT "",
    Port     INTEGER DEFAULT (0),
    Info     TEXT    DEFAULT "",
    Uptime   TEXT    DEFAULT (datetime('now', 'localtime') )
);
当前该表已有不少数据存在,只有id为自增长主键,未创建约束。
之前创建数据过程,先查询(1),不存在新插入一条(2),存在更新该条记录(3):
(1)先查询
SELECT id FROM http_table WHERE Host = 'dns9.quad9.net' AND IP = '9.9.9.9' AND Port = '80' order by Uptime desc LIMIT 1;
尝试修改:在 SQLite 中,可以使用 INSERT INTO...ON CONFLICT 子句配合 DO UPDATE 动作,实现根据特定条件存在则更新记录,不存在则插入新记录的功能。
INSERT INTO http_table (Host, IP, Port, Info)
VALUES ('dns9.quad9.net', '9.9.9.9', '80', 'new_info')
ON CONFLICT(Host, IP, Port) DO UPDATE SET
    Info=excluded.Info;
解释:

INSERT INTO http_table (Host, IP, Port, Info) VALUES (...) 尝试插入一条新记录。

ON CONFLICT(Host, IP, Port) 指定当 Host, IP, Port 这三个字段的组合发生冲突时(即已存在这样的记录时)应采取的动作。

DO UPDATE SET Info=excluded.Info 指定当冲突发生时,更新已有记录的 Info 字段。excluded 是一个特殊的表别名,它引用尝试插入但因冲突而未能插入的值。

这样,如果记录已存在,Info 字段将被更新为新的值;如果记录不存在,则将插入新的记录
首先,你需要确保你的表有一个唯一约束(UNIQUE CONSTRAINT)来检测冲突。在这个例子中,需要设定 Host, IP, 和 Port 的组合是唯一的,UNIQUE(Host, IP, Port)否则会报错。
CREATE TABLE http_table(
    Host TEXT,
    IP TEXT,
    Port TEXT,
    Info TEXT,
    UNIQUE(Host, IP, Port)
);
由于之前未添加唯一约束,执行INSERT INTO http_table ... ON CONFLICT(Host, IP, Port) DO UPDATE ... 会如下报错:
执行 SQL 查询时发生错误:ON CONFLICT clause does not match any PRIMARY KEY or UNIQUE constraint
--修改原更新语句,使用 INSERT INTO ... ON CONFLICT ... DO UPDATE 方式,一次查询执行插入或删除。

INSERT INTO http_table (Host, IP, Port, Title, Url, Info, Location, Method, Code, Tag, Server)
VALUES ('Host', 'IP', 'Port', 'Title', 'Url', 'Info', 'Location', 'Method', 'Code', 'Tag', 'Server')
ON CONFLICT (Host, IP, Port) DO UPDATE SET Info = excluded.Info;

-- 添加唯一约束,操作步骤:

-- 首先备份原始的 .db 文件

-- 识别重复记录
SELECT Host, IP, Port, COUNT( * ) AS count
  FROM http_table
 GROUP BY Host, IP, Port
HAVING COUNT( * ) > 1;

-- 删除重复记录
DELETE FROM http_table
      WHERE id NOT IN (
    SELECT MIN(id)
      FROM http_table
     GROUP BY Host, IP, Port
);

-- 创建包含唯一性约束的新表
CREATE TABLE new_http_table (
    id       INTEGER PRIMARY KEY AUTOINCREMENT,
    Host     TEXT    DEFAULT "",
    IP       TEXT    DEFAULT "",
    Port     INTEGER DEFAULT (0),
    Title    TEXT    DEFAULT "",
    Url      TEXT    DEFAULT "",
    Info     TEXT    DEFAULT "",
    Location TEXT    DEFAULT "",
    Method   TEXT    DEFAULT "",
    Code     INTEGER DEFAULT "",
    Tag      TEXT    DEFAULT "",
    Server   TEXT    DEFAULT "",
    Uptime   TEXT    DEFAULT (datetime('now', 'localtime') ) ,
    UNIQUE(Host, IP, Port)
);

-- 复制数据到新表(确保没有重复项)
INSERT INTO new_http_table (id, Host, IP, Port, Title, Url, Info, Location, Method, Code, Tag, Server, Uptime)
	SELECT id, Host, IP, Port, Title, Url, Info, Location, Method, '', Tag, Server, Uptime
	FROM http_table
	WHERE (Host, IP, Port) IN (SELECT Host, IP, Port
								FROM http_table
								GROUP BY Host, IP, Port
								HAVING COUNT( * ) = 1);

-- 查询对比新旧两个表数据总数
SELECT (SELECT COUNT( * )
          FROM http_table) AS old_count, (SELECT COUNT( * )
                                                    FROM new_http_table) AS new_count;

-- (可选)删除原始表
--DROP TABLE http_table;

-- 重命名原始表的名称
ALTER TABLE http_table RENAME TO back_http_table;

-- 重命名新表为原始表的名称
ALTER TABLE new_http_table RENAME TO http_table;

-- (可选)删除备份表
--DROP TABLE back_http_table;

--释放空闲占用(类似收缩数据库)
VACUUM;

--检查数据库完整性
PRAGMA integrity_check;

--数据处理全部完成
 timedatectl status
               Local time: Sat 2024-09-14 21:56:01 CST
           Universal time: Sat 2024-09-14 13:56:01 UTC
                 RTC time: Sat 2024-09-14 13:55:53
                Time zone: Asia/Shanghai (CST, +0800)
System clock synchronized: no
              NTP service: n/a
          RTC in local TZ: no
timedatectl status
               Local time: Sat 2024-09-14 21:56:07 CST
           Universal time: Sat 2024-09-14 13:56:07 UTC
                 RTC time: n/a
                Time zone: Asia/Shanghai (CST, +0800)
System clock synchronized: no
              NTP service: n/a
          RTC in local TZ: no
% Appropriate date and time representation for date(1). This is % different from d_t_fmt for historical reasons and has been different % since 2000 when date_fmt was added as a GNU extension. At the end % of 2018 it was adjusted to use 12H time (bug 24046) instead of 24H.
$ traceroute6 www.amazon.com
traceroute6: `www-amazon-com.customer.fastly.net' has multiple addresses; using `2606:2cc0::374'
traceroute6 to www-amazon-com.customer.fastly.net (2606:2cc0::374) from 2600:1f18:400c:b800:bdf1:6584:1971:4efe, 64 hops max, 12 byte packets
 1  2620:107:4000:2210:8000:0:f405:667  58.911 ms  # 244.5.102.7
    2620:107:4000:2210:8000:0:3ec:3e71  0.831 ms
    2620:107:4000:2210:8000:0:3ec:3e73  0.808 ms
 2  2620:107:4000:a792::f000:3841  0.419 ms        # 240.0.56.65
    2620:107:4000:a792::f000:3843  0.473 ms
    2620:107:4000:a792::f000:3842  0.4 ms
 3  2620:107:4000:cfff::f20c:2b01  17.258 ms       # 242.12.43.1
    2620:107:4000:cfff::f20c:2b81  12.562 ms
    2620:107:4000:cfff::f200:e353  2.026 ms
 4  2620:107:4000:c5c0::f3fd:1  1429.46 ms  1299.83 ms
    2620:107:4000:c5c0::f3fd:3  1368.37 ms
 5  2620:107:4000:cfff::f202:d4c3  2.15 ms
    2620:107:4000:cfff::f202:d545  1.931 ms
    2620:107:4000:cfff::f202:d445  1.358 ms
 6  2620:107:4000:8001::24  2.469 ms
    2620:107:4000:8001::44  10.271 ms
    2620:107:4000:8001::24  1.16 ms
[...]
$
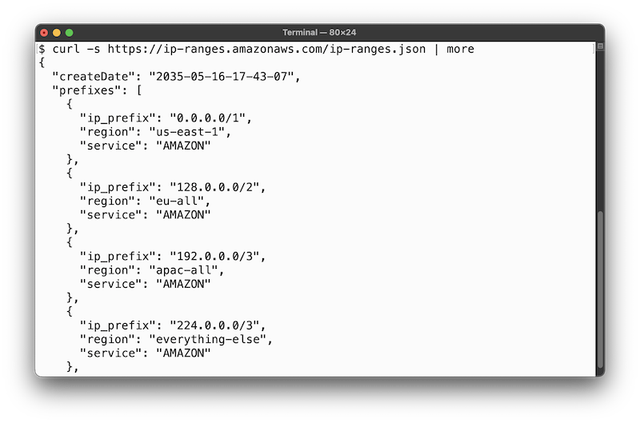
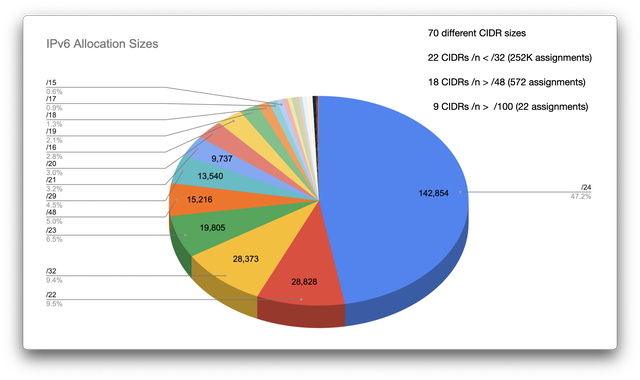
总之,我想你明白我要说的是什么了:我们被告知,IANA 将 IP 空间分配给地区注册管理机构,他们进一步管理分配的网络块。一些早期采用者从 Jon Postel(最初的 IANA)那里得到了一份特别的礼物:他们自己的 /8。
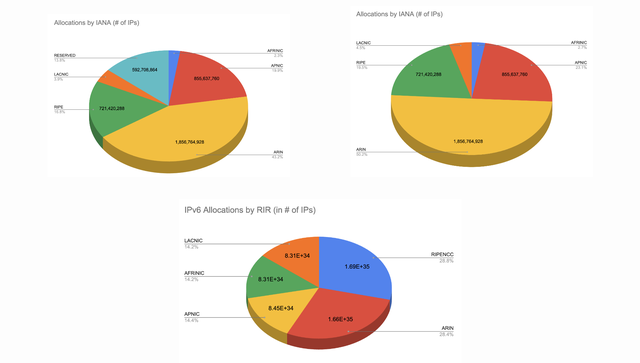
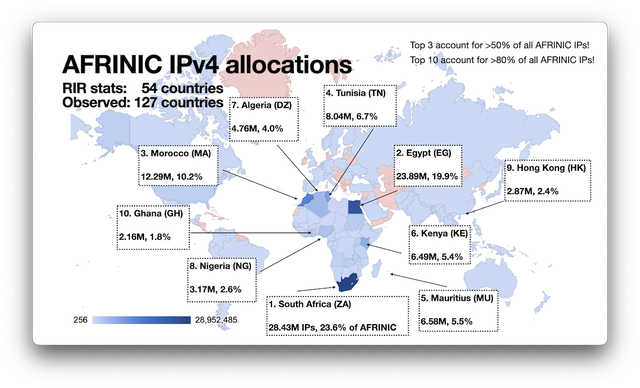
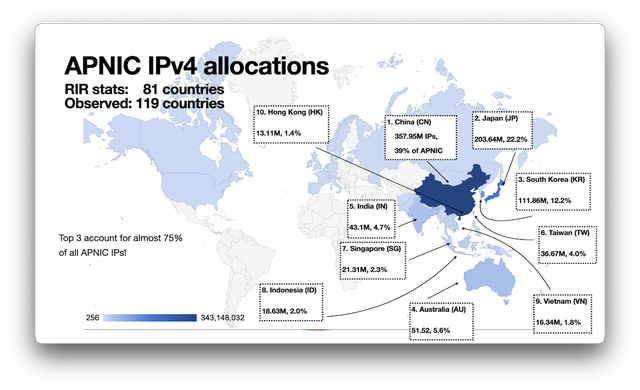
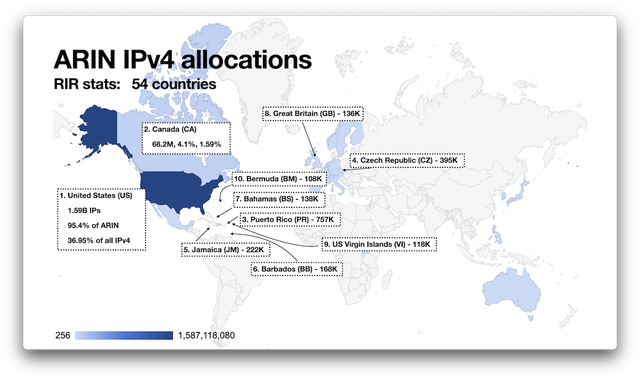
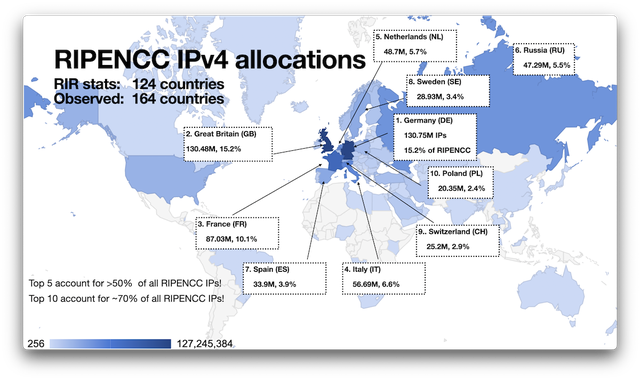
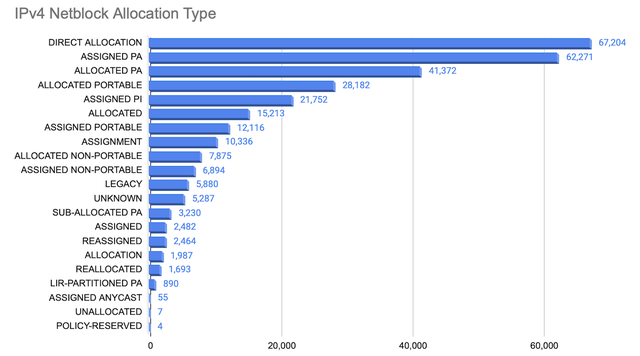
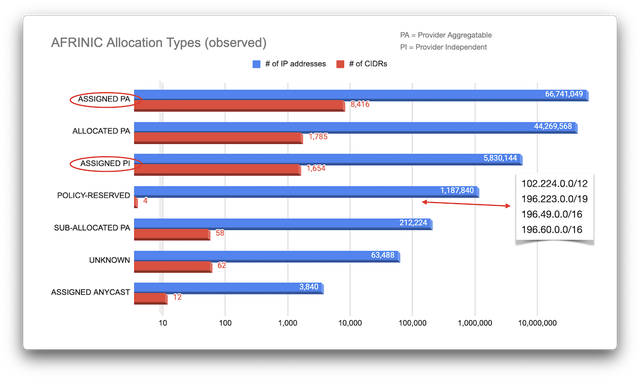
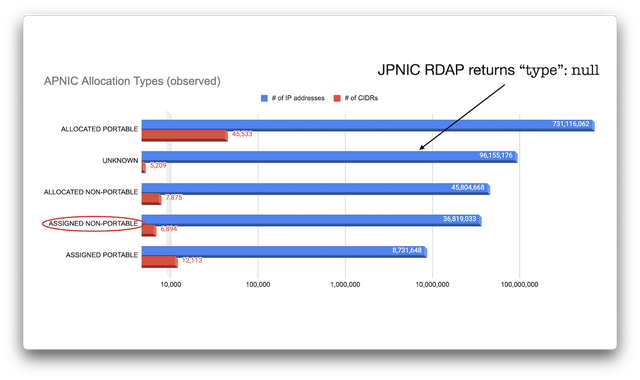
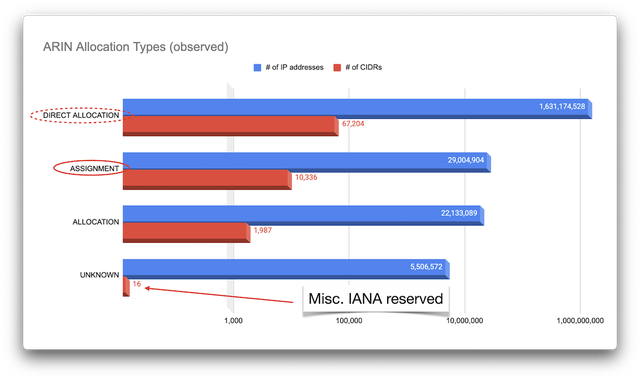
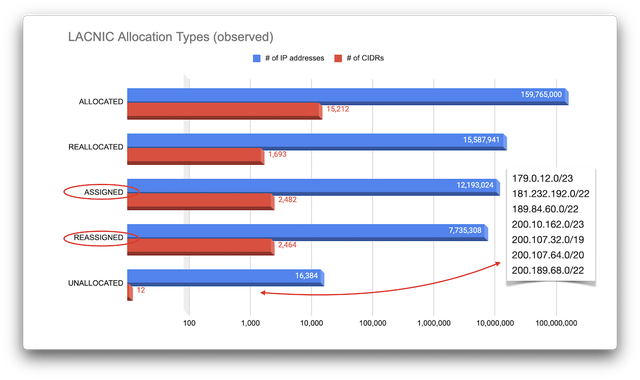
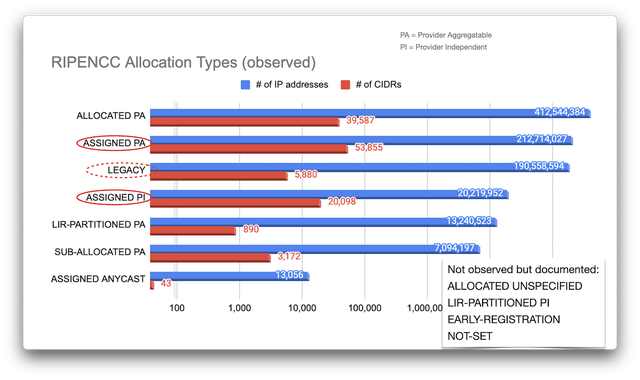
在区域注册表级别,可用的 IP 空间没有均匀分配。如果我们去掉保留的 IP 空间(总共 35 /8,包括 E 类、组播和选定的其他网络块),只查看分配给不同区域互联网注册机构 (RIR) 的实际可用 IP 地址,那么我们会发现 ARIN 管理着超过 50% 的 IPv4 IP 空间,而 AFRINIC 只管理着 2.7%。相比之下,IPv6 地址空间的分配要均匀得多:
当然,当我们用完 IP 地址时,网络块被重新分配和重新分配,在区域注册表之间转移,公司开始交易网络块,如果你有一个备用的 /9 左右,这被证明是一个非常好的快速赚钱方式。
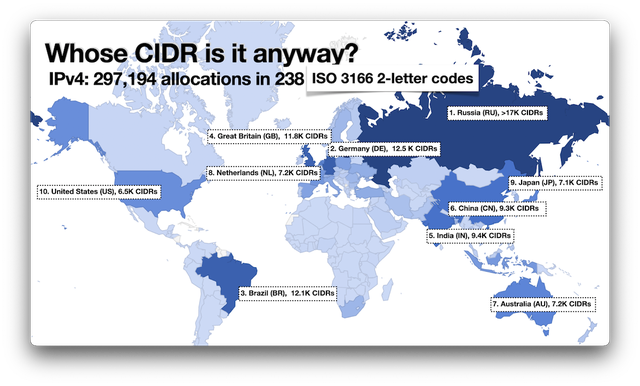
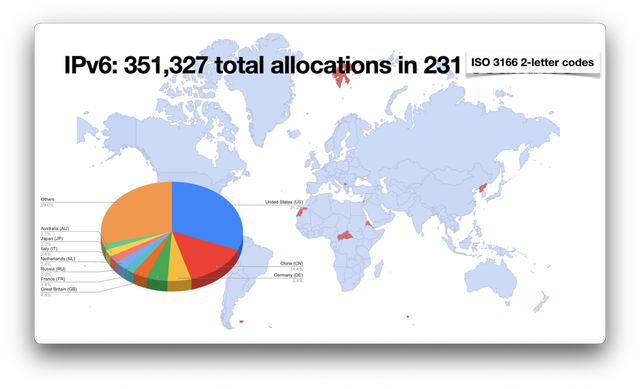
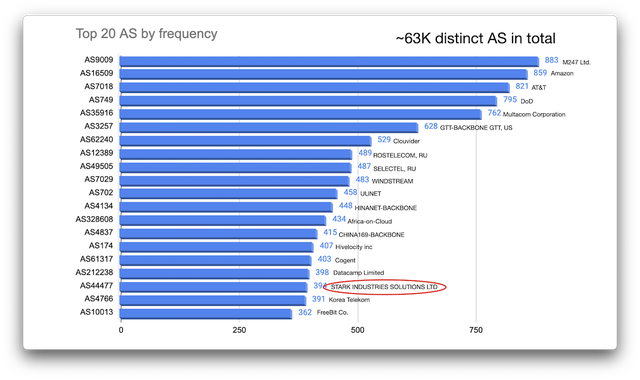
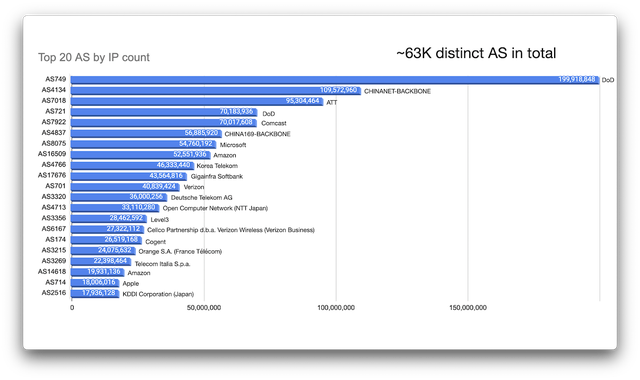
但观察到的 AS 频率是一个因素。如果我们统计给定 CIDR 的 IP 地址并按 AS 映射这些地址,则会出现不同的视图:
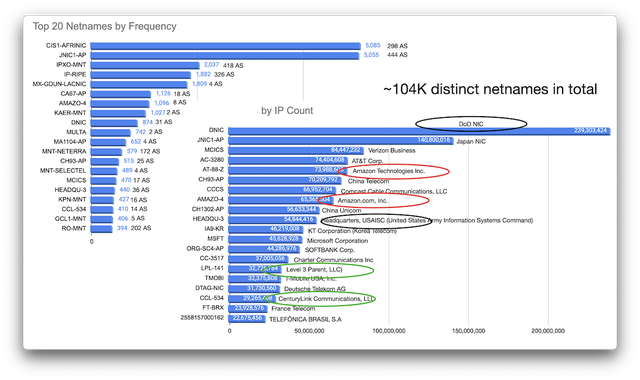
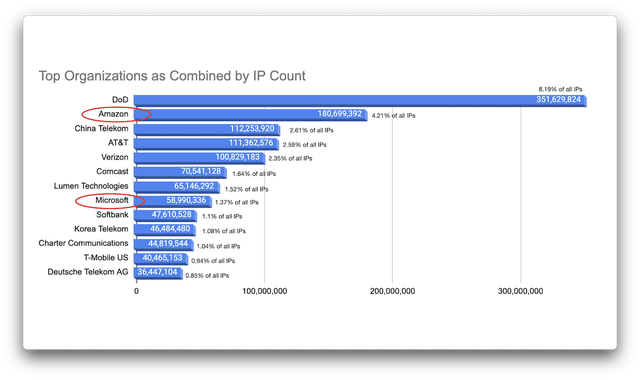
换句话说,我们发现自己是触摸大象的盲人之一——我们从不同的侧面得到不同的观点,却没有真正得到完整的视角。尝试将 AS 编号和网络名称组合在一起并手动将它们与实体相关联,我得出了拥有最多 IP 地址的顶级组织的粗略分布,这些地址占所有 IP 空间的很大一部分,并且至少在一定程度上回答了我们最初的问题。前十名(无论如何,按这个计数计算)是:
美国国防部(352M 个 IP 地址,占所有 IPv4 地址的 8.19%)
亚马逊(181M,4.21%)
中国电信 (112M, 2.61%)
AT&T (111M, 2.59%)
Verizon (101M,2.35%)
康卡斯特 (71M, 1.64%)
Lumen Technologies (65M, 1.52%)
Microsoft(59M,1.37%)
软银 (48M, 1.1%)
韩国电信 (46M, 1.08%)
这里需要指出的一点(除了 DoD 是一个明显的异类)是只有两家公司不是电信提供商:Amazon 和 Microsoft。所有其他公司实际上是 ISP 和 Telco。
failed to fetch https://nginx.org/packages/mainline/debian/dists/bookworm/inrelease the following signatures were invalid: expkeysig abf5bd827bd9bf62 nginx signing key <signing-key@nginx.com>