Debian 12 apt update GPG error: NO_PUBKEY

debian 11 版本更新 到 12,update出现两个错误。

,Hit:5 https://packages.microsoft.com/debian/12/prod bookworm InRelease

Err:5 https://packages.microsoft.com/debian/12/prod bookworm InRelease
The following signatures couldn’t be verified because the public key is not available: NO_PUBKEY EB3E94ADBE1229CF

W: An error occurred during the signature verification. The repository is not updated and the previous index files will be used. GPG error: https://packages.microsoft.com/debian/12/prod bookworm InRelease: The following signatures couldn’t be verified because the public key is not available: NO_PUBKEY EB3E94ADBE1229CF

解决办法:

1 下载 https://packages.microsoft.com/config/debian/12/prod.list 替换 /etc/apt/sources.list.d/microsoft-prod.list

2 直接修改 /etc/apt/sources.list.d/microsoft-prod.list 为以下内容:

deb [arch=amd64,arm64,armhf signed-by=/usr/share/keyrings/microsoft-prod.gpg] https://packages.microsoft.com/debian/12/prod bookworm main

Hit:6 https://packages.sury.org/php bookworm InRelease

W: https://packages.sury.org/php/dists/bookworm/InRelease: Key is stored in legacy trusted.gpg keyring (/etc/apt/trusted.gpg), see the DEPRECATION section in apt-key(8) for details.
W: Failed to fetch https://packages.microsoft.com/debian/12/prod/dists/bookworm/InRelease The following signatures couldn’t be verified because the public key is not available: NO_PUBKEY EB3E94ADBE1229CF
W: Some index files failed to download. They have been ignored, or old ones used instead.

解决办法,执行以下命令:

sudo wget -O /etc/apt/trusted.gpg.d/php.gpg https://packages.sury.org/php/apt.gpg

在web页面中使用HTML  Symbol作为URL链接字符

看到一个地址链接中有个图标做链接锚点,尝试下确实可以打开。。。

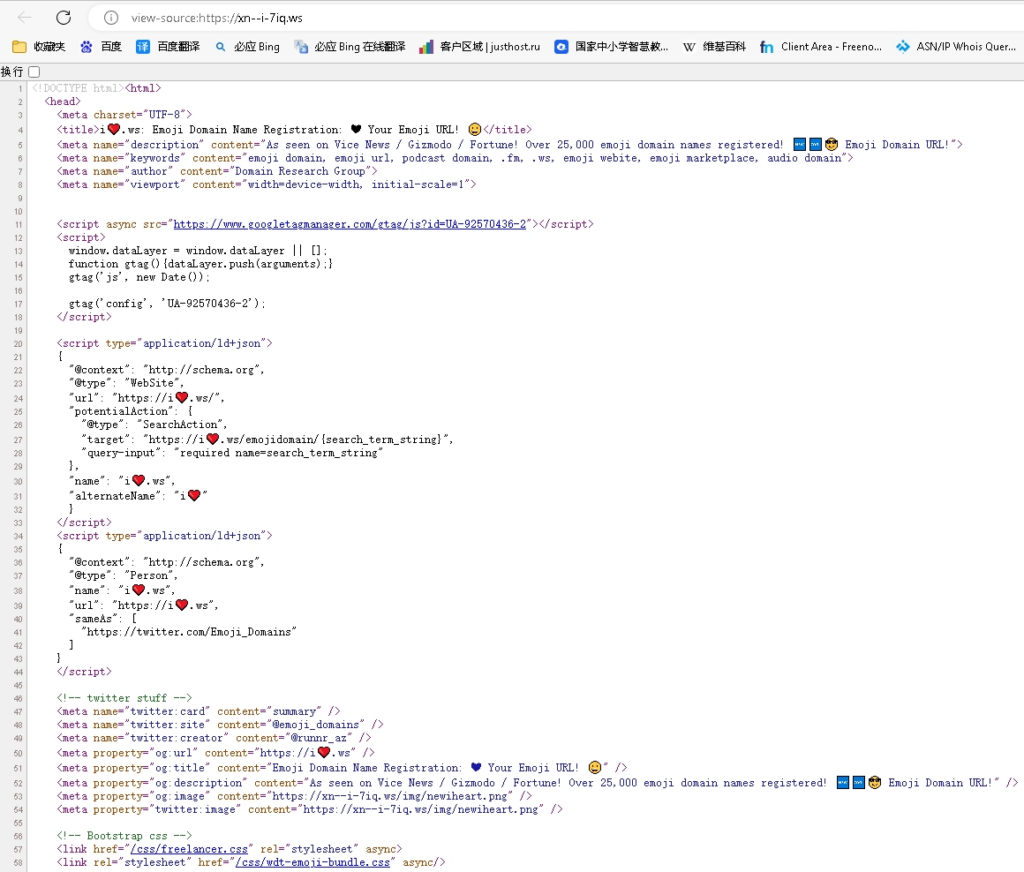
查看代码里也是符号

<a href="https://api2u.me/tag/📚Curricula.html">📚Curricula</a>

然后直接复制进浏览器地址栏,也是可以的。Google Chrome,Microsoft Edge都可以粘贴。查询下

以前知道在html中显示转义符号,可没想过用Emoji 在代码里可以做连接符号。。。竟然浏览器也都支持了。。。

大致了解了下,我的理解是,其实使用Chromium内核的浏览器本身就可以看作一个 建构在web之上的应用容器,它已经将符号编码转义渲染了一次。所以可以在渲染代码之前就显示符号。

Link Emoji Meaning: Uses, How to Reply & More – wikihow.com

点击上面的链接,打开的页面地址栏会有带有下面图标链接的URL。

我先试试在CMD下的效果。

如果你安装了powershell 可以本机命令,wget https://xn--i-7iq.ws

在命令行窗口内也会显示符号图标

在 linux bash下 curl https://xn--i-7iq.ws 也可以显示,但是与cmd下完全不同。

📚 ❤️🔗

符号在各种编码下的编码

🔗https://www.htmlsymbol.com/unicode-code/1f517.html

Technical information
Name:Link Symbol
Symbol:🔗
Unicode Number:U+1F517
HTML Code:&#128279; &#x1F517;
HTML Entity:
CSS Code:\1F517
UTF-8 Encoding:0x1F517
UTF-16 Encoding:0x0001F517
UTF-32 Encoding:0x000000000001F517
Hex 2700-27BF / Decimal 9984-10175

https://www.w3schools.com/charsets/ref_utf_dingbats.asp

Example

<p>I will display &#9986;</p>
<p>I will display &#x2702;</p>

Will display as:

I will display ✂
I will display ✂

符号在HTML中的使用。

参考站点:

HTML Symbol Unicode symbols, html entities and codes https://www.htmlsymbol.com/

HTML Unicode (UTF-8) Reference https://www.w3schools.com/charsets/ref_html_utf8.asp

符号查询

EmojiXD®️ https://emojixd.com/

EmojiXD是一本线上Emoji百科全书📚,收录了所有emoji,帮你通过分类或者搜索轻松找到合适的表情符号,并了解各种emoji符号的相关知识和使用情景

Letterlike Symbols – https://www.unichar.app/web/

HTML Unicode (UTF-8) Reference – https://graphemica.com/🔗

VPS下检测虚拟化方式的工具

imvirt

http://micky.ibh.net/~liske/imvirt.html

virt-what

https://people.redhat.com/~rjones/virt-what/

另外,wsl下执行“lsb_release -a”查看发行版本,会提示:“lsb_release: command not found”

执行命令安装 lsb_release

apt-get install -y lsb-release

解决wsl两个子系统同时登录ssh,以及ping,sftp权限的问题

重装了windows的linux子系统,从wsl到wsl2,安装了一个kali,一个debian(其实这两个装一个就行了)

试试能不能ssh,发现没ssh服务,先安装

sudo apt install openssh-server
sudo systemctl start ssh

之后ssh上去之后,想改ssh端口,发现sftp编辑sshd_config文件提示“Permission denied”。给sshd_config加上权限,还不行,发现原来是sftp-server没权限。。。加上权限,可以编辑文件了。

sudo chmod u+s /usr/lib/openssh/sftp-server

设置ssh自启动

sudo systemctl enable ssh

查看子系统IP地址,ping自己一下也是没权限。加上权限

sudo chmod u+s /usr/bin/ping

然后同时开了kali,debian两个子系统的CMD窗口。查看ip,竟然两个子系统ip地址是一样的?没搞明白,怎么选择登录另一个子系统?是不是不能同时登录两个子系统呢?

先测试一下,打开两个子系统(顺序是先kali,再Debian),ssh登录22端口,连到的是第一个打开的子系统kali。再修改子系统kali的ssh端口到2022,再连22端口,连接失败,sudo service ssh restart 重启子系统Debian的ssh服务,再连22端口,Debian就连上了。这样两台子系统就可以同时ssh登录。

———————————————————————-

#如果Debian 中service 命令不存在,先安装 sysvinit-utils 包.

sudo apt-get install sysvinit-utils

如果已经安装,先在~/.bashrc 中添加 $PATH

PATH=$PATH:/usr/sbin

重启bash,service命令就可用了。

 service --status-all

Openwrt 一次自动更新全部软件包

1.使用 opkg 命令更新

opkg update
opkg upgrade luci 
opkg list-upgradable | grep luci- | cut -f 1 -d ' ' | xargs opkg upgrade

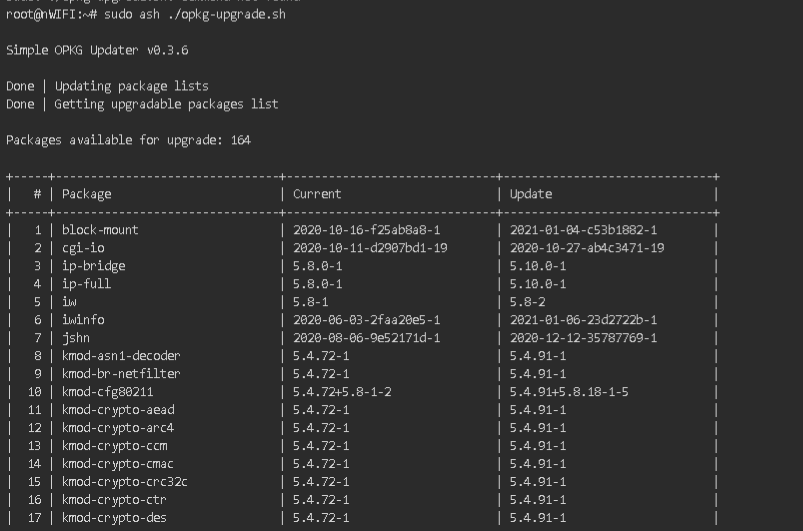
在ssh下,先“opkg update”,获取更新。之后再更新“ luci-” 开头的包。如果 要全部无条件更新,就去掉过滤“ grep luci- |”

2 使用 opkg-upgrade.sh 更新(推荐)

https://github.com/tavinus/opkg-upgrade

使用sh脚本更新,需要 curl 或 wget,使用Https链接的话,还需要SSL支持。

注意:curl / wget 可能会因为缺少 SSL 证书而失败。
您可以使用以下命令选择忽略证书检查:

curl -k
wget --no-check-certificate

或者,您将需要修复您的安装。
请注意,SSL支持会占用相当多的存储空间。/etc/ssl/certs/ca-certificates.crt

#这应该足以使SSL工作:

opkg install ca-certificates openssl-util

#如果您仍有问题,这可能是一种解决方法:

mkdir -p -m0755 /etc/ssl/certs && curl -k -o /etc/ssl/certs/ca-certificates.crt -L http://curl.haxx.se/ca/cacert.pem
  • 安装到当前目录,使用./opkg-upgrade.sh 执行:
# 根据使用 wget curl ,是否SSL,选择对应命令执行。

# using wget with SSL
wget 'https://raw.githubusercontent.com/tavinus/opkg-upgrade/master/opkg-upgrade.sh' -O "opkg-upgrade.sh" && chmod 755 "opkg-upgrade.sh"

# using wget WITHOUT SSL
wget --no-check-certificate 'https://raw.githubusercontent.com/tavinus/opkg-upgrade/master/opkg-upgrade.sh' -O "opkg-upgrade.sh" && chmod 755 "opkg-upgrade.sh"

# using curl with SSL
curl -L 'https://raw.githubusercontent.com/tavinus/opkg-upgrade/master/opkg-upgrade.sh' -o "opkg-upgrade.sh" && chmod 755 "opkg-upgrade.sh"

# using curl WITHOUT SSL
curl -k -L 'https://raw.githubusercontent.com/tavinus/opkg-upgrade/master/opkg-upgrade.sh' -o "opkg-upgrade.sh" && chmod 755 "opkg-upgrade.sh"
# 执行更新
./opkg-upgrade.sh
  • (推荐)安装到系统(无需.sh扩展):/usr/sbin/opkg-upgrade
# 根据使用 wget curl ,是否SSL,选择对应命令执行。

# using wget with SSL
wget 'https://raw.githubusercontent.com/tavinus/opkg-upgrade/master/opkg-upgrade.sh' -O "/usr/sbin/opkg-upgrade" && chmod 755 "/usr/sbin/opkg-upgrade"

# using wget WITHOUT SSL
wget --no-check-certificate 'https://raw.githubusercontent.com/tavinus/opkg-upgrade/master/opkg-upgrade.sh' -O "/usr/sbin/opkg-upgrade" && chmod 755 "/usr/sbin/opkg-upgrade"

# using curl with SSL
curl -L 'https://raw.githubusercontent.com/tavinus/opkg-upgrade/master/opkg-upgrade.sh' -o "/usr/sbin/opkg-upgrade" && chmod 755 "/usr/sbin/opkg-upgrade"

# using curl WITHOUT SSL
curl -k -L 'https://raw.githubusercontent.com/tavinus/opkg-upgrade/master/opkg-upgrade.sh' -o "/usr/sbin/opkg-upgrade" && chmod 755 "/usr/sbin/opkg-upgrade"
# 执行更新
opkg-upgrade

将更新命令加入自定义菜单

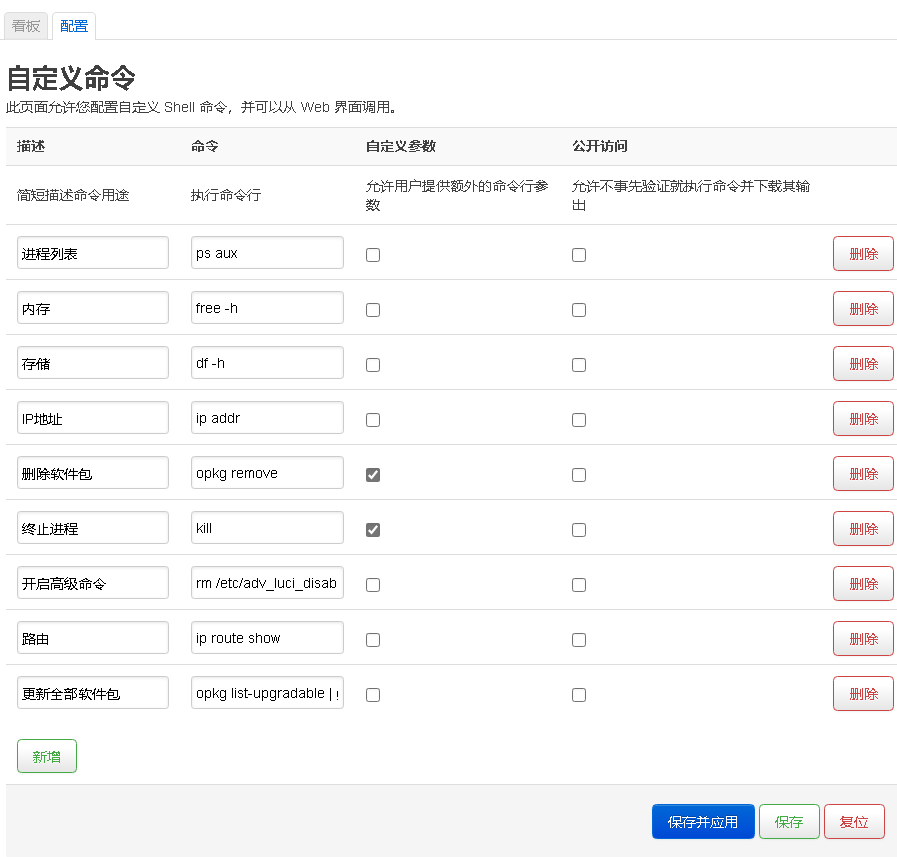
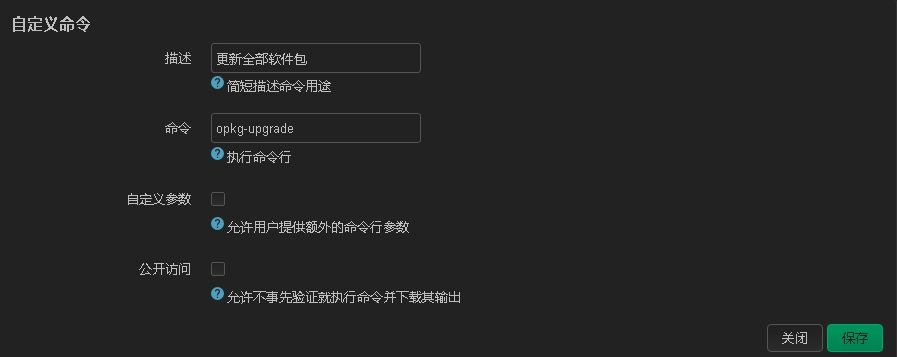
可以先安装 luci-app-commands

opkg install luci-app-commands

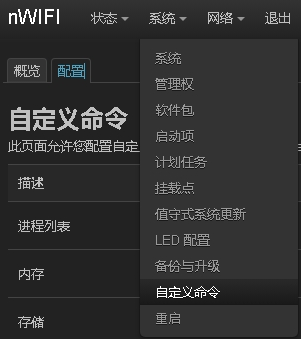
安装后,就可在luci的系统菜单中

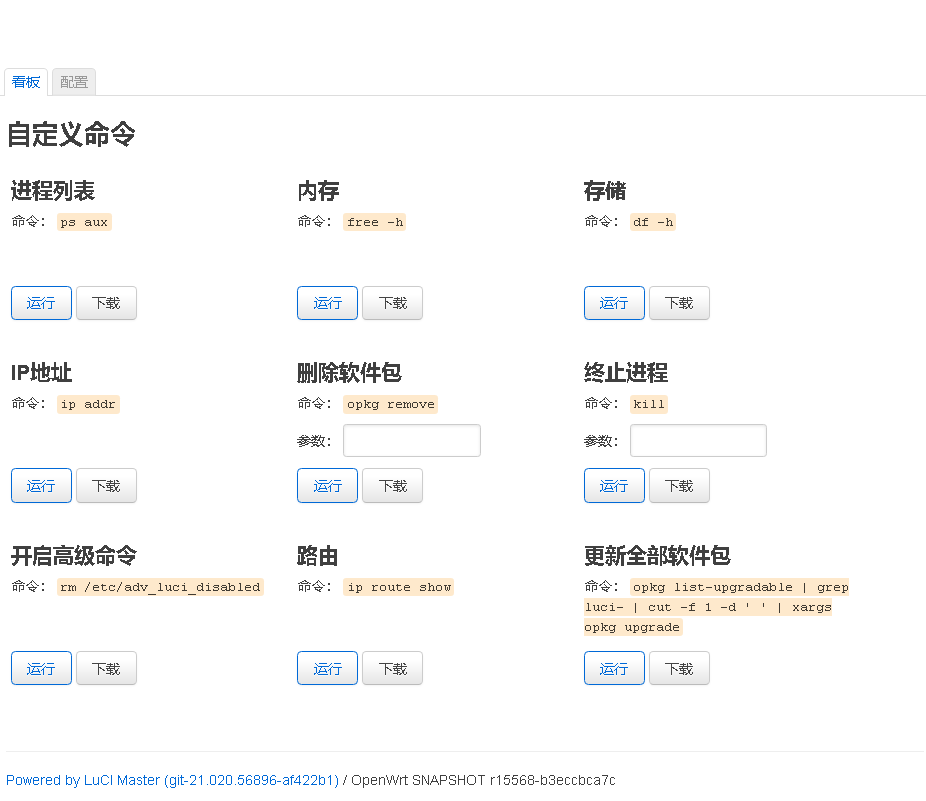
使用自定义命令进行更新,一键就直接执行,更方便!如下图

这样就可以在 luci 界面,使用opkg-upgrade一键更新所有软件包了!

Chrome 与 Flash 说再见

Adobe宣布计划在2020年底停止支持Flash。

20年来,Flash一直在帮助您塑造在网络上玩游戏、观看视频和运行应用程序的方式。但是在过去的几年里,flash已经不那么常见了。三年前,80%的桌面Chrome用户每天访问一个带有Flash的网站。今天的使用率只有17%,而且还在继续下降。

这一趋势表明,网站正在向比Flash更快、更节能的开放式Web技术转移。它们也更安全,因此在购物、银行或阅读敏感文档时更安全。它们也可以在移动和桌面上工作,所以你可以在任何地方访问你最喜欢的站点。

这些开放式Web技术在去年年底成为Chrome的默认体验,当时网站开始需要请求您的许可才能运行Flash。在接下来的几年里,Chrome将继续逐步淘汰Flash,首先是请求您允许在更多情况下运行Flash,最后在默认情况下禁用它。到2020年底,我们将把flash完全从chrome中删除。

如果你今天经常访问一个使用flash的网站,你可能会想知道这对你有何影响。如果网站迁移到开放式Web标准,除了不再看到在该网站上运行flash的提示外,您不应该注意到有什么不同。如果站点继续使用flash,并且您授予站点运行flash的权限,那么它将一直工作到2020年底。

为了确保网络准备好无闪存,需要与Adobe、其他浏览器和主要发行商密切合作。我们支持Adobe今天的声明,我们期待着与所有人合作,使网络变得更好。

Windows下 NTP时间服务器设置

NTP时间服务器
pool.ntp.org: public ntp time server : https://www.ntppool.org/zh/

pool.ntp.org 是一个以时间服务器的大虚拟集群为上百万的客户端提供可靠的 易用的 网络时间协议(NTP)服务的项目

NTP池正在为世界各地成百上千万的系统提供服务。 它是绝大多数主流Linux发行版和许多网络设备的默认“时间服务器”


国内NTP服务 http://ntp.org.cn/pool.php

设置

Windows 可以使用系统内置的ntp客户端: 以管理员权限在命令行运行如下指令:

w32tm /config /syncfromflags:manual /manualpeerlist:"0.pool.ntp.org 1.pool.ntp.org 2.pool.ntp.org 3.pool.ntp.org"

这在Windows 2003及之后的版本中被支持。 如果您使用旧版的Windows,您可以尝试如下指令:

net time /setsntp:"0.pool.ntp.org 1.pool.ntp.org 2.pool.ntp.org"

作为管理员,右键任务栏的时钟,选择“更改日期和时间设置…”,并且在“Internet时间”选项卡下输入服务器名也能达到同样的效果。

sqlite 简单手记

delete from TableName;  //清空数据 
update sqlite_sequence SET seq = 0 where name ='TableName';//自增长ID为0
更新删除时,如何插入有单引号(')的字符串,将所有单引号替换为两个单引号

sql = sql.Replace("'","''");

保存到SQLite数据库中时自动恢复为单引号,也就是说使用双单引号即可,例如:
INSERT INTO TableName VALUES('James''s Street');
插入数据库的是: James's Street 。

sqlite数据库在搜索的时候,一些特殊的字符需要进行转义, 具体的转义如下: 
     /   ->    //
     ‘   ->    ”
     [   ->    /[
     ]   ->    /]
     %   ->    /%
     &   ->    /&
        ->    /
     (   ->    /(
     )   ->    /)

Asp.Net core Linux 监听端口的设置

在linux测试跑.net core,默认端口是5000,5001. 需要修改

尝试有以下几种方式:

1. 在项目csproj文件在linux中,编辑Properties/launchSettings.json文件中的 “applicationUrl”: “http://*:5000;http://*:5050”

2.编辑Program,直接在代码里定义

public class Program
{
    public static void Main(string[] args)
    {
        var host = new WebHostBuilder()
            .UseKestrel()
            .UseContentRoot(Directory.GetCurrentDirectory())
            .UseIISIntegration()
            .UseStartup<Startup>()
            .UseUrls("http://*:5001/")
            .Build();

        host.Run();
    }
}

3.添加配置文件hosting.json,然后在Program中加载配置文件

public static void Main(string[] args)
{
    var config = new ConfigurationBuilder()
        .SetBasePath(Directory.GetCurrentDirectory())
        .AddJsonFile("hosting.json", true)
        .Build();

    var host = new WebHostBuilder()
        .UseKestrel(options => options.AddServerHeader = false)
        .UseConfiguration(config)
        .UseContentRoot(Directory.GetCurrentDirectory())
        .UseIISIntegration()
        .UseStartup<Startup>()
        .Build();

    host.Run();
}

4. 直接启动时增加参数,两种

在发布文件夹下直接加载dll:

dotnet WebApp1.dll --server.urls "http://*:5001;http://*:5002"

在项目文件下:

dotnet run --urls="http://*:5001/;http://*:5051/"


LocalStorage 本地存储

Cookie不多说了。

Web SQL Database实际上已经被废弃,而HTML5的支持的本地存储实际上变成了

Web Storage(Local Storage和Session Storage)与IndexedDB。

Web Storage使用简单字符串键值对在本地存储数据,方便灵活,但是对于大量结构化数据存储力不从心,IndexedDB是为了能够在客户端存储大量的结构化数据,并且使用索引高效检索的API。

sessionStorage和上文中提到的localStorage非常相识,方法也几乎一样:

非常通俗易懂的接口:

  • sessionStorage.getItem(key):获取指定key本地存储的值
  • sessionStorage.setItem(key,value):将value存储到key字段
  • sessionStorage.removeItem(key):删除指定key本地存储的值
  • sessionStorage.length是sessionStorage的项目数

sessionStorage与 localStorage 的异同

sessionStorage 和 localStorage 就一个不同的地方, sessionStorage数据的存储仅特定于某个会话中,也就是说数据只保持到浏览器关闭,当浏览器关闭后重新打开这个页面时, 之前的存储已经被清除。而 localStorage 是一个持久化的存储,它并不局限于会话。

使用 Web Storage(Local Storage和Session Storage)

首先自然是检测浏览器是否支持本地存储。在HTML5中,本地存储是一个window的属性,包括localStorage和sessionStorage,从名字应该可以很清楚的辨认二者的区别,前者是一直存在本地的,后者只是伴随着session,窗口一旦关闭就没了。二者用法完全相同,这里以localStorage为例。

if(window.localStorage){
alert(‘This browser supports localStorage’);
}else{
alert(‘This browser does NOT support localStorage’);
}

存储数据的方法就是直接给window.localStorage添加一个属性,例如:window.localStorage.a 或者 window.localStorage[“a”]。它的读取、写、删除操作方法很简单,是以键值对的方式存在的,如下:

localStorage.a = 3;//设置a为”3″
localStorage[“a”] = “sfsf”;//设置a为”sfsf”,覆盖上面的值
localStorage.setItem(“b”,”isaac”);//设置b为”isaac”
var a1 = localStorage[“a”];//获取a的值
var a2 = localStorage.a;//获取a的值
var b = localStorage.getItem(“b”);//获取b的值
localStorage.removeItem(“c”);//清除c的值

这里最推荐使用的自然是getItem()和setItem(),清除键值对使用removeItem()。如果希望一次性清除所有的键值对,可以使用clear()。另外,HTML5还提供了一个key()方法,可以在不知道有哪些键值的时候使用,如下:

var storage = window.localStorage;
function showStorage(){
for(var i=0;i<storage.length;i++){
//key(i)获得相应的键,再用getItem()方法获得对应的值
document.write(storage.key(i)+ ” : ” + storage.getItem(storage.key(i)) + “<br>”);
}
}

html5客户端本地存储之sessionStorage的实例页面

http://www.css88.com/demo/sessionStorage/

http://www.css88.com/demo/sessionStorage/index2.html

http://www.css88.com/demo/sessionStorage/index3.html

Web Storage Support Test

http://dev-test.nemikor.com/web-storage/support-test/