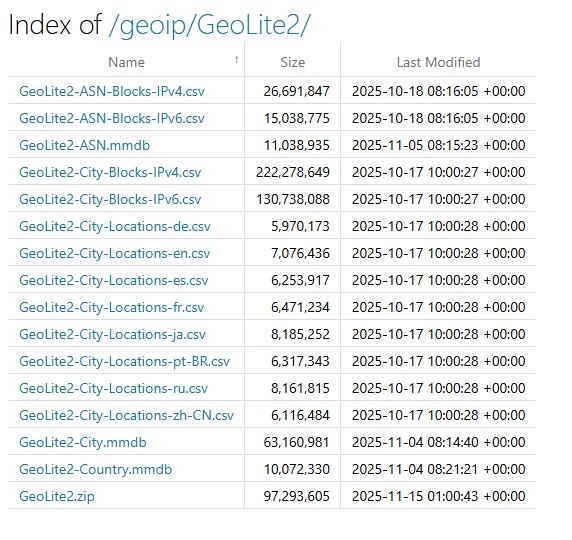
在开发轻量级 API 时,.NET MiniAPI 凭借其简洁高效的特性成为首选。但实际场景中,我们常需要暴露静态文件(如 API 文档、配置文件、共享资源),甚至允许客户端浏览目录下的文件列表。默认情况下,MiniAPI 的静态文件服务不支持目录浏览,且原生目录列表无排序功能,本文将详细记录如何实现「指定目录暴露 + 目录浏览 + 列表排序」的完整方案,附完整代码和优化细节。
一、需求背景
在 MiniAPI 中实现以下核心功能:
- 暴露服务器上的指定物理目录(如
GeoIP文件夹),支持客户端通过 URL 访问文件; - 启用目录浏览功能,允许客户端列出目录下的文件/子目录;
- 目录列表支持按「名称、大小、修改时间」排序(点击表头切换升序/降序);
- 优化目录列表样式,保持简洁易用,同时兼容 AOT 编译。
二、实现步骤(基于 .NET MiniAPI > 8.0)
1. 环境准备
创建 .NET MiniAPI 项目(若已有项目可跳过):
dotnet new web -n MiniApiStaticFileDemo
cd MiniApiStaticFileDemo
2. 核心配置:暴露指定物理目录 + 启用目录浏览
在 Program.cs 中配置静态文件中间件和目录浏览功能,核心是指定物理目录、URL 访问路径,并关联自定义排序格式化器。
2.1 Program.cs 完整配置
using Microsoft.AspNetCore.StaticFiles;
using Microsoft.Extensions.FileProviders;
using System.Text;

var builder = WebApplication.CreateSlimBuilder(args);
var app = builder.Build();

// 关键配置:指定要暴露的物理目录
string baseDir = AppContext.BaseDirectory; // 程序运行目录
string exposeDir = Path.Combine(baseDir, "GeoIP"); // 要暴露的目录(如 GeoIP 文件夹)
string urlPrefix = "/geoip"; // 客户端访问前缀(通过 /geoip 访问该目录)

// 1. 配置静态文件服务:暴露指定物理目录
app.UseStaticFiles(new StaticFileOptions
{
    FileProvider = new PhysicalFileProvider(exposeDir), // 物理目录路径
    RequestPath = urlPrefix, // URL 访问路径(例:http://localhost:5000/geoip/文件名称)
    OnPrepareResponse = ctx =>
    {
        // 可选:添加响应头,禁止缓存静态文件
        ctx.Context.Response.Headers.Append("Cache-Control", "no-cache, no-store");
    }
});

// 2. 启用目录浏览(默认禁用),并关联自定义排序格式化器
app.UseDirectoryBrowser(new DirectoryBrowserOptions
{
    FileProvider = new PhysicalFileProvider(exposeDir),
    RequestPath = urlPrefix, // 与静态文件访问路径保持一致
    Formatter = new SortableDirectoryFormatter("GeoIP 目录列表") // 自定义格式化器(支持排序)
});

// 测试接口
app.MapGet("/", () => Results.Ok("MiniAPI 静态文件服务 + 可排序目录浏览已启用"));

app.Run("http://*:5000");
3. 关键实现:自定义可排序目录格式化器
默认的目录浏览列表无排序功能,且样式简陋。我们通过实现 IDirectoryFormatter 接口,自定义目录列表的 HTML 输出,添加「名称、大小、修改时间」排序功能,同时优化样式和安全性。
3.1 完整 SortableDirectoryFormatter 类
创建 SortableDirectoryFormatter.cs 文件,核心功能包括:
- 过滤隐藏文件(以
.开头的文件); - 目录在前、文件在后的默认排序;
- 点击表头切换排序方向(升序/降序);
- 支持按名称、文件大小、修改时间排序;
- XSS 防护、跨平台路径处理。
using Microsoft.AspNetCore.Http;
using Microsoft.Extensions.FileProviders;
using System.Globalization;
using System.Text;
public class SortableDirectoryFormatter : IDirectoryFormatter
{
private readonly string _pageTitle;
// 时间格式:年-月-日 时:分:秒(UTC 时区)
private const string CustomDateTimeFormat = "yyyy-MM-dd HH:mm:ss +00:00";
// 构造函数:支持自定义页面标题
public SortableDirectoryFormatter(string pageTitle = "目录列表")
{
_pageTitle = pageTitle ?? "目录列表";
}
public async Task GenerateContentAsync(HttpContext context, IEnumerable<IFileInfo> contents)
{
// 1. 过滤隐藏文件 + 初始排序(目录在前,文件在后)
var safeContents = contents ?? Enumerable.Empty<IFileInfo>();
var fileList = new List<IFileInfo>(safeContents.Where(f =>
!string.IsNullOrEmpty(f.Name) && !f.Name.StartsWith(".")
));
fileList.Sort((a, b) =>
{
if (a.IsDirectory != b.IsDirectory)
return a.IsDirectory ? -1 : 1;
return string.Compare(a.Name, b.Name, StringComparison.OrdinalIgnoreCase);
});
// 2. 生成面包屑导航(支持多层目录跳转)
var breadcrumbBuilder = new StringBuilder();
string currentPath = "/";
breadcrumbBuilder.Append($"<a href=\"{HtmlEncode(currentPath)}\">/</a>");
var requestPath = context.Request.Path.Value;
if (!string.IsNullOrEmpty(requestPath))
{
var pathSegments = requestPath.Split('/', StringSplitOptions.RemoveEmptyEntries | StringSplitOptions.TrimEntries);
foreach (var segment in pathSegments)
{
currentPath = Path.Combine(currentPath, segment + "/").Replace(Path.DirectorySeparatorChar, '/');
breadcrumbBuilder.Append($"<a href=\"{HtmlEncode(currentPath)}\">{HtmlEncode(segment)}/</a>");
}
}
// 3. 构建 HTML 页面(含样式 + 排序脚本)
var htmlBuilder = new StringBuilder(4096);
htmlBuilder.AppendLine("<!DOCTYPE html>");
htmlBuilder.AppendLine("<html lang=\"zh-CN\">");
htmlBuilder.AppendLine("<head>");
htmlBuilder.AppendLine($"<title>{_pageTitle} - {HtmlEncode(requestPath ?? "/")}</title>");
// 样式:保持简洁,适配不同设备
htmlBuilder.AppendLine(@"<style>
body { font-family: ""Segoe UI"", ""Microsoft YaHei"", sans-serif; font-size: 14px; max-width: 1200px; margin: 0 auto; padding: 20px; }
header h1 { font-size: 24px; font-weight: 400; margin: 0 0 20px 0; color: #333; }
#index { width: 100%; border-collapse: separate; border-spacing: 0; border: 1px solid #eee; }
#index th { background: #f8f9fa; padding: 10px; text-align: center; cursor: pointer; user-select: none; position: relative; border-bottom: 2px solid #ddd; }
#index td { padding: 8px 10px; border-bottom: 1px solid #eee; }
#index th:hover { background: #f1f3f5; }
#index td.length, td.modified { text-align: right; }
a { color: #127aac; text-decoration: none; }
a:hover { color: #13709e; text-decoration: underline; }
.sort-arrow { position: absolute; right: 8px; font-size: 0.8em; color: #999; }
.dir-name { font-weight: 500; }
</style>");
htmlBuilder.AppendLine("</head>");
htmlBuilder.AppendLine("<body>");
htmlBuilder.AppendLine($"<header><h1>{_pageTitle}:{breadcrumbBuilder}</h1></header>");
htmlBuilder.AppendLine("<table id=\"index\">");
htmlBuilder.AppendLine("<thead><tr>");
htmlBuilder.AppendLine("<th data-col=\"name\">名称 <span class=\"sort-arrow\">↑</span></th>");
htmlBuilder.AppendLine("<th data-col=\"size\">大小 <span class=\"sort-arrow\"></span></th>");
htmlBuilder.AppendLine("<th data-col=\"modified\">最后修改时间 <span class=\"sort-arrow\"></span></th>");
htmlBuilder.AppendLine("</tr></thead><tbody>");
// 4. 生成文件/目录列表行
if (fileList.Count == 0)
{
htmlBuilder.AppendLine("<tr><td colspan=\"3\" style=\"text-align:center; padding:20px; color:#666;\">目录无可用文件</td></tr>");
}
else
{
foreach (var file in fileList)
{
var fileName = file.IsDirectory ? $"{file.Name}/" : file.Name;
var fileClass = file.IsDirectory ? "dir-name" : "";
var fileSize = file.IsDirectory ? "-" : FormatFileSizeWithComma(file.Length);
var fileModified = file.LastModified.ToUniversalTime().ToString(CustomDateTimeFormat, CultureInfo.InvariantCulture);
var encodedFileName = Uri.EscapeDataString(file.Name);
var fileUrl = $"{context.Request.Path}/{encodedFileName}".Replace("//", "/");
htmlBuilder.AppendLine("<tr>");
htmlBuilder.AppendLine($"<td class=\"name {fileClass}\"><a href=\"{HtmlEncode(fileUrl)}\">{HtmlEncode(fileName)}</a></td>");
htmlBuilder.AppendLine($"<td class=\"length\">{HtmlEncode(fileSize)}</td>");
htmlBuilder.AppendLine($"<td class=\"modified\">{HtmlEncode(fileModified)}</td>");
htmlBuilder.AppendLine("</tr>");
}
}
htmlBuilder.AppendLine("</tbody></table>");
// 5. 排序核心脚本(点击表头切换排序)
htmlBuilder.AppendLine(@"<script>
document.addEventListener('DOMContentLoaded', function() {
const table = document.getElementById('index');
if (!table) return;
const headers = table.querySelectorAll('thead th[data-col]');
const tbody = table.querySelector('tbody');
let currentSort = { col: 'name', order: 'asc' };
// 表头点击事件
headers.forEach(th => {
th.addEventListener('click', function() {
const newCol = this.dataset.col;
currentSort.order = (currentSort.col === newCol) ? (currentSort.order === 'asc' ? 'desc' : 'asc') : 'asc';
currentSort.col = newCol;
updateSortArrows();
sortTable();
});
});
// 更新排序箭头
function updateSortArrows() {
headers.forEach(th => {
const arrow = th.querySelector('.sort-arrow');
arrow.textContent = (th.dataset.col === currentSort.col) ? (currentSort.order === 'asc' ? '↑' : '↓') : '';
});
}
// 排序逻辑
function sortTable() {
const rows = Array.from(tbody.querySelectorAll('tr'));
if (!rows.length) return;
rows.sort((a, b) => {
const cellA = a.querySelector(`td.${getCellClass(currentSort.col)}`).textContent.trim();
const cellB = b.querySelector(`td.${getCellClass(currentSort.col)}`).textContent.trim();
switch (currentSort.col) {
case 'name':
const isDirA = cellA.endsWith('/');
const isDirB = cellB.endsWith('/');
if (isDirA !== isDirB) return isDirA ? -1 : 1;
return currentSort.order === 'asc' ? cellA.localeCompare(cellB, 'zh-CN') : cellB.localeCompare(cellA, 'zh-CN');
case 'size':
if (cellA === '-') return -1;
if (cellB === '-') return 1;
const sizeA = BigInt(cellA.replace(/,/g, ''));
const sizeB = BigInt(cellB.replace(/,/g, ''));
return currentSort.order === 'asc' ? (sizeA < sizeB ? -1 : 1) : (sizeA > sizeB ? -1 : 1);
case 'modified':
const dateA = new Date(cellA.replace(' +00:00', 'Z')).getTime();
const dateB = new Date(cellB.replace(' +00:00', 'Z')).getTime();
return currentSort.order === 'asc' ? (dateA - dateB) : (dateB - dateA);
default: return 0;
}
});
tbody.innerHTML = '';
rows.forEach(row => tbody.appendChild(row));
}
function getCellClass(colName) {
return colName === 'name' ? 'name' : colName === 'size' ? 'length' : 'modified';
}
updateSortArrows();
});
</script>");
htmlBuilder.AppendLine("</body></html>");
// 输出响应
context.Response.ContentType = "text/html; charset=utf-8";
await context.Response.WriteAsync(htmlBuilder.ToString(), Encoding.UTF8);
}
// 辅助方法:文件大小格式化(带千分位)
private static string FormatFileSizeWithComma(long bytes)
{
return bytes.ToString("N0", CultureInfo.InvariantCulture);
}
// 辅助方法:HTML 编码(防 XSS)
private static string HtmlEncode(string value)
{
if (string.IsNullOrEmpty(value)) return string.Empty;
return value.Replace("&", "&")
.Replace("<", "<")
.Replace(">", ">")
.Replace("\"", """)
.Replace("'", "'")
.Replace("`", "`");
}
}4. 核心功能说明
4.1 静态文件服务配置
PhysicalFileProvider(exposeDir):指定要暴露的物理目录(如GeoIP文件夹,位于程序运行目录下);RequestPath = "/geoip":客户端通过http://localhost:5000/geoip/文件名访问文件;OnPrepareResponse:可选配置,添加缓存控制头,避免浏览器缓存静态文件。
4.2 目录浏览功能
UseDirectoryBrowser:启用目录浏览(默认禁用),需与静态文件服务的FileProvider和RequestPath保持一致;SortableDirectoryFormatter:自定义目录列表格式化器,替代默认的简陋列表,支持排序和样式优化。
4.3 排序功能实现
- 前端:通过 JavaScript 监听表头点击事件,切换排序字段(名称/大小/修改时间)和排序方向(升序/降序);
- 排序逻辑:
- 名称排序:目录优先,文件在后,按字母/中文拼音排序;
- 大小排序:目录显示
-,文件按数值大小排序(去除千分位逗号); - 时间排序:将 UTC 时间转换为时间戳排序,兼容
2025-10-18 08:16:06 +00:00格式。
三、关键优化点(兼容生产环境)
1. 安全性优化
- XSS 防护:通过
HtmlEncode方法对文件名、路径等用户可控内容进行编码,避免脚本注入; - 隐藏文件过滤:默认过滤以
.开头的文件(如.gitignore、.env),防止敏感文件泄露; - 可选:添加身份认证(如 API Key、JWT),限制目录浏览权限(例:
RequireAuthorization())。
2. 兼容性优化
- 跨平台支持:使用
Path.Combine和路径分隔符替换,兼容 Windows/Linux/macOS; - AOT 编译兼容:避免反射和动态代码,支持 .NET 8+ AOT 编译(可直接发布为原生可执行文件);
- 空值安全:处理
contents为null、文件名为空等异常场景,避免程序崩溃。
3. 体验优化
- 面包屑导航:支持多层目录跳转(如
/geoip/GeoLite2/),方便用户回溯; - 时间格式标准化:统一使用
yyyy-MM-dd HH:mm:ss +00:00格式,避免时区混淆; - 响应头优化:指定
charset=utf-8,确保中文文件名正常显示。
四、测试效果
- 运行项目:
dotnet run; - 在程序运行目录下创建
GeoIP文件夹,放入测试文件/子目录; - 访问
http://localhost:5000/geoip,即可看到目录列表:- 默认按名称升序排列,目录在前,文件在后;
- 点击表头「名称」「大小」「最后修改时间」可切换排序方式;
- 点击文件名/目录名可直接访问(目录会进入下一级列表)。
五、扩展场景
- 静态资源托管:用于托管 API 文档(如 Swagger、Redoc)、前端静态文件(Vue/React 构建产物);
- 内部文件共享:团队内部临时共享文件(结合身份认证,避免公开访问);
- 日志文件查看:暴露日志目录,支持按修改时间排序查看最新日志文件。
六、总结
通过 .NET MiniAPI 的静态文件中间件 + 自定义目录格式化器,我们仅需少量代码就实现了「指定目录暴露 + 可排序目录浏览」功能。该方案简洁高效,兼容生产环境,适用于轻量级文件服务场景。如需进一步增强,可扩展权限控制、文件上传、下载限速等功能。
下载 Demo : MiniApiStaticFileDemo.zip
如果有任何问题或优化建议,欢迎在评论区交流~
